 Avg. 8 min read
 Get Started With Newsletter Content
This guide shows how to get started with Newsletter Content, create campaigns, and configure design. You can also jump directly to a provider-specific setup below.
Use Hello Retail Newsletter Content to embed product recommendations in your newsletters and marketing emails.
Prerequisite
Before you can create a campaign, you must first create a Newsletter Content design. To learn how, click here. When your design is ready, continue with this guide.
If you want to head to a specific setup for one of our partner newsletter providers, then feel free to navigate to them here:
- Rule
- MarketingPlatform
- Omnisend
- Drip
- HeyLoyalty
- Klaviyo
- ActiveCampaign
- MailChimp
- MailCamp
- Bullsender
- Apsis
How to set it up
Create your first email campaign with product recommendations:
- Log in to your Hello Retail account. In the left-hand menu, open the Emails section and click Newsletter Content to expand the menu.
- From the drop-down, click Overview. From here, you can choose between three campaign types.
- When creating a new campaign, configure the following:
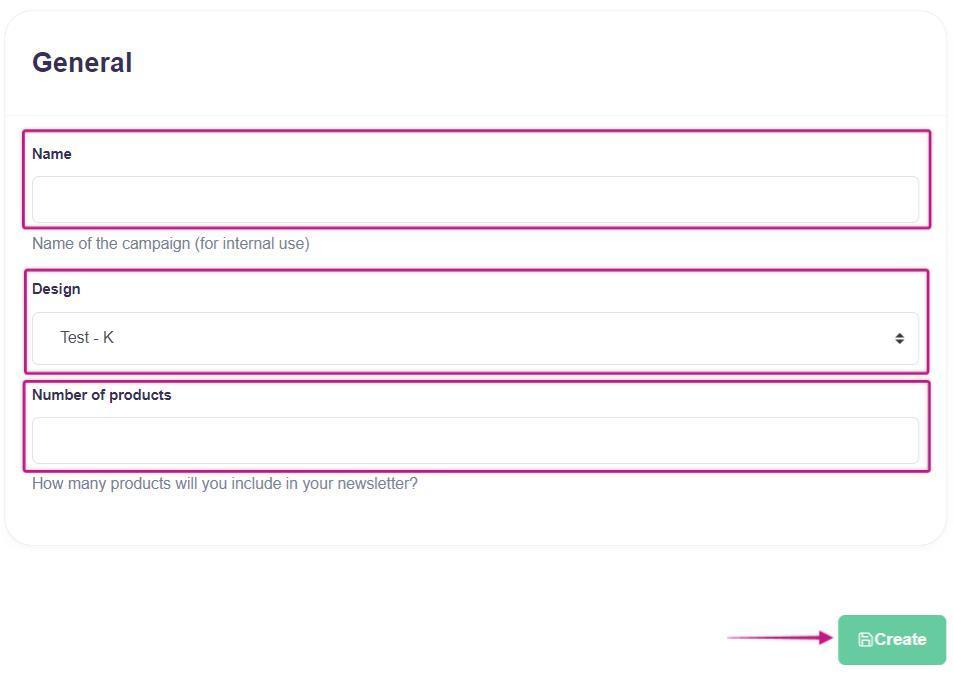
4. Once you are done, click Create to continue.
- Name: Choose a clear campaign name, for example "Christmas campaign" or "Weekly newsletter, week 50".
- Number of products: Select how many product recommendations to include. For example, choose 2 to place two recommendations side by side.
- Design: Select the design for your campaign.
Design the product recommendation view
5. Configure the product recommendation view. You can set width, height, font, font sizes, and highlight colors.
On the right side of the screen, you can preview the generated product recommendation view (based on a random product from your catalog):
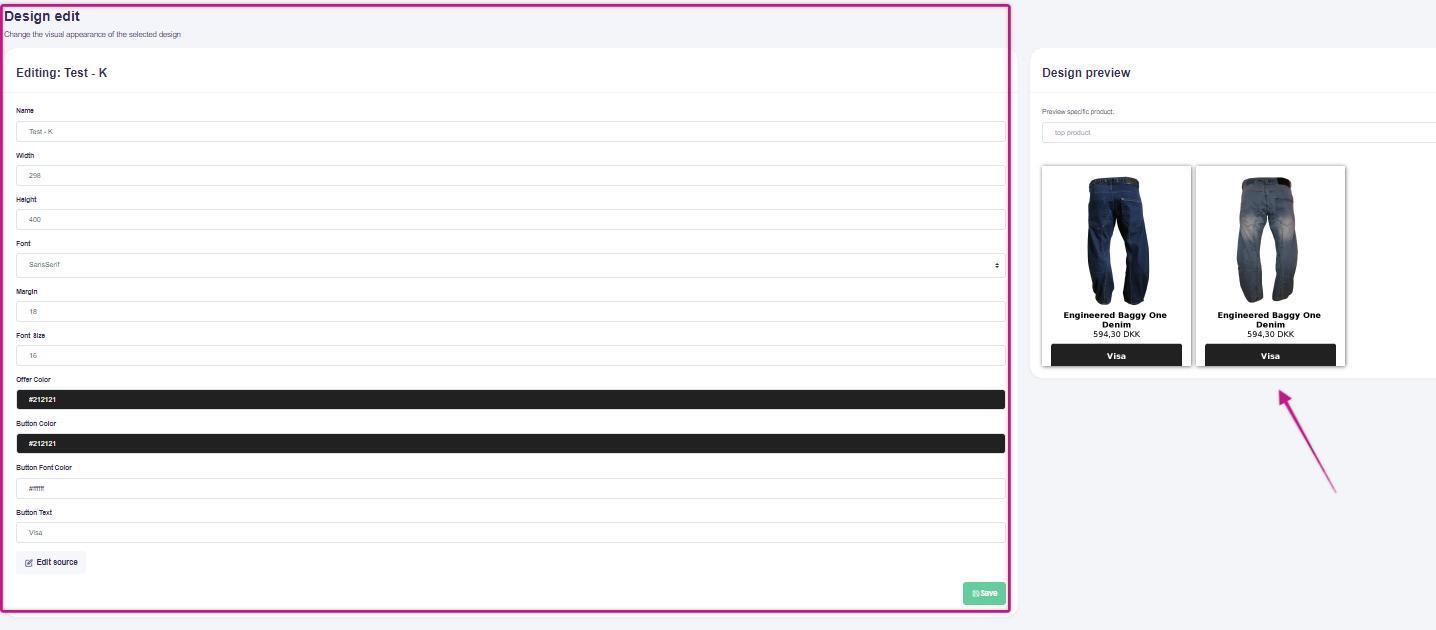
6. When you are done, click Save and continue to the Products configuration.
Recommendation strategy
Configure which products to show in the newsletter. You can pick a standard recommendation strategy and customize it by changing strategy steps and applying filters.
The system automatically avoids showing products that have been shown to the same recipient in another campaign sent in the past month. If more than 10 campaigns were sent in the past month, it considers only the 10 most recent campaigns.
Code section
- In the Code section, copy the code snippet and paste it into your newsletter template. If you use a provider such as MailChimp, Ubivox, Carmamail, Apsis, Loyaltymanager, or Responsys, select it from the list to get a provider-ready snippet.
Note
If your email provider is not listed, replace EMAIL_ADDRESS with the provider's email merge tag, for example {{ EMAIL }}. This allows Hello Retail to resolve each recipient and return personalized recommendations. 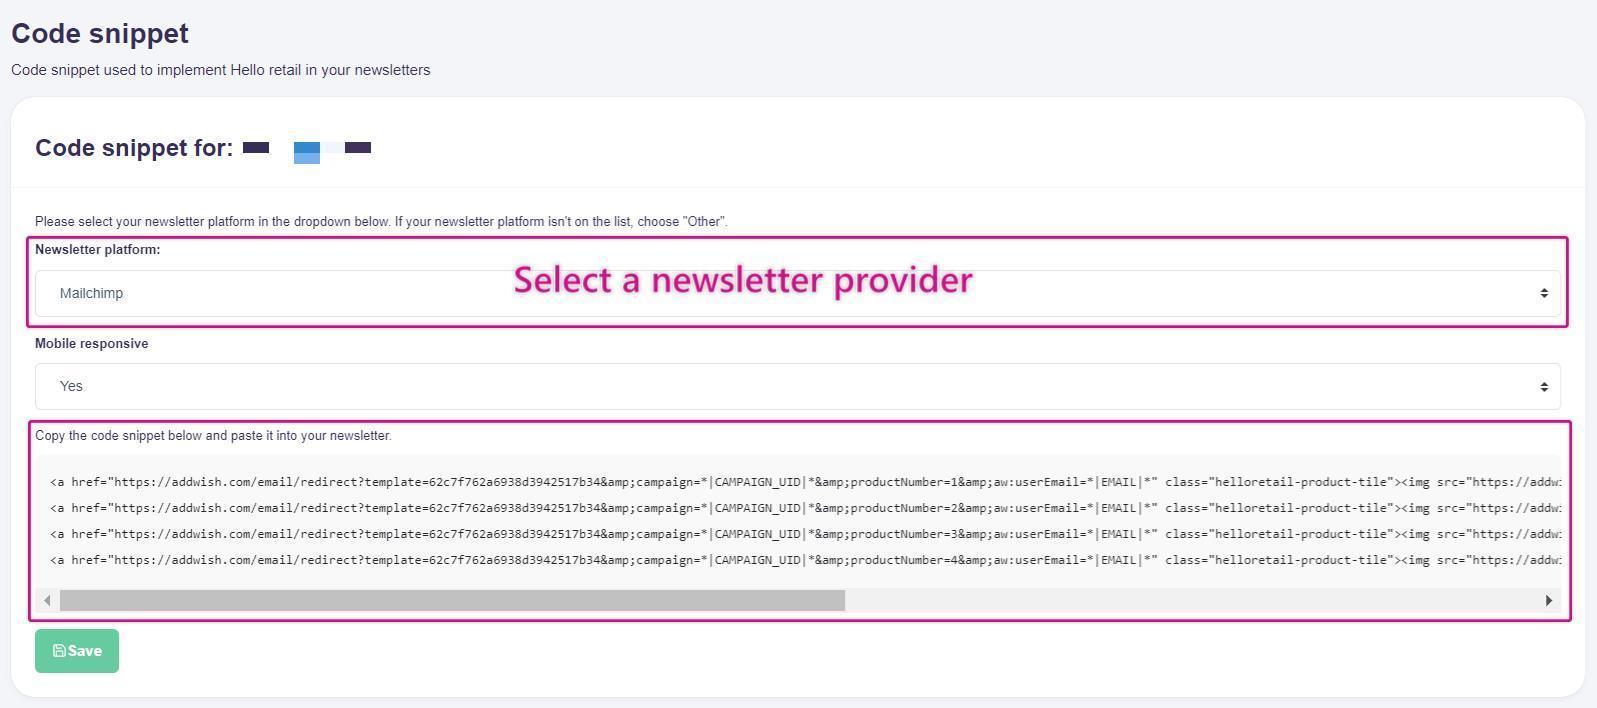
2. The setup is complete once you place the snippet in your template and replace EMAIL_ADDRESS with your provider's replacement parameter.
If you insert the code once, it renders one recommendation. You can insert it multiple times to render multiple recommendations.
Ensure you have enough products in step 2. Update PRODUCT_NUMBER to avoid duplicates. Each unique PRODUCT_NUMBER produces a different product. Use ascending numbers (for example, 1, 2, 3) to render different products.
EMAIL_ADDRESS and PRODUCT_NUMBER must be updated in two places per product: the product link and the image URL.
Note
You can also find a list of video guides for popular newsletter platforms here: /platforms-and-newsletter-providers/how-to-integrate-recommendations-into-your-newsletters/.
Code snippet: Multiple campaigns in the same email
The newsletter content system ensures products are not shown more than once within the same campaign.
If you need multiple campaigns in the same email, add a bit more configuration:
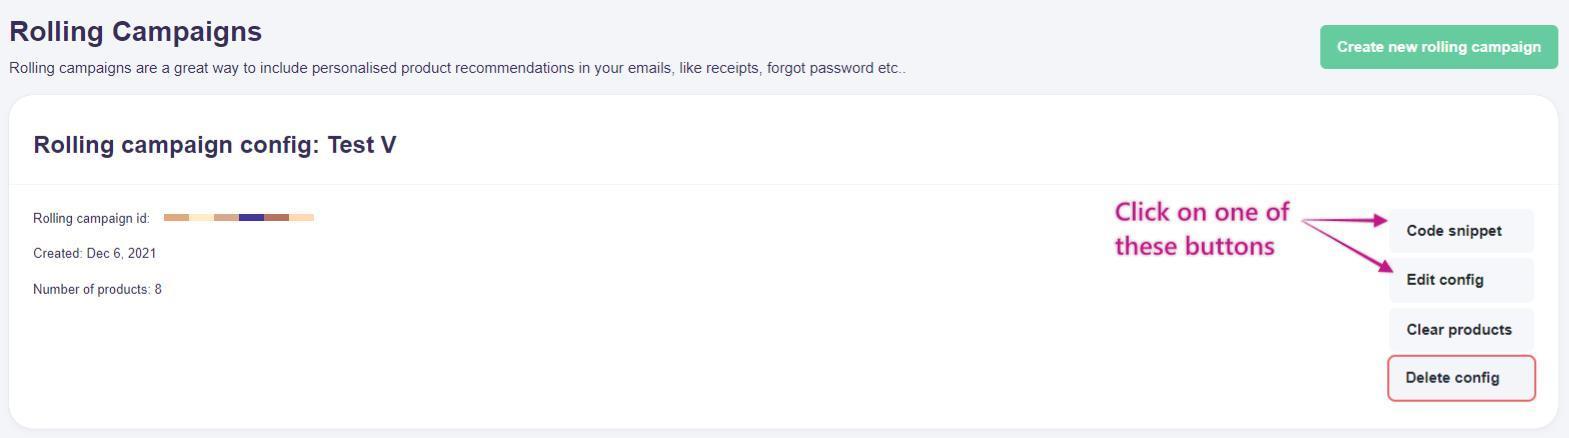
- Log in to your Hello Retail account. In the left-hand menu, open Emails and click Newsletter Content.
- From the drop-down, open the relevant campaign (auto, rolling, or manual).
- Inside the campaign, click Edit config to access the code snippet overview. You can also click Code snippet.
- Scroll to the Code snippet section and expand it.
- Double-click inside the code editor to select the entire snippet.
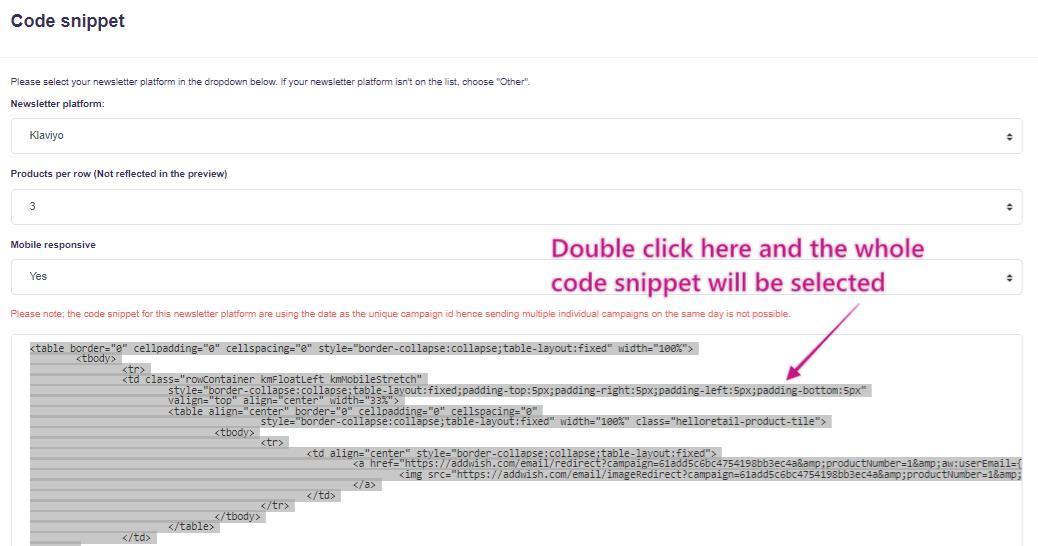
- Copy and paste the snippet into your editor or directly into your provider.
-
Add excludeFromCampaigns to both the image URLs and links.
The excludeFromCampaigns parameter accepts a comma-separated list of complete campaign IDs. The system will exclude products that appear in the listed campaigns when selecting products for the current campaign.
For an auto campaign, the complete campaign ID is {template key}-{campaign id}.
Apply the same configuration for all products in each campaign.
Example of three campaigns that each exclude the two others:
<h2>Campaign 1</h2>
<a href="https://core.helloretail.com/serve/tile/click?template=aaa6534270e6100619f8708f&campaign=c1&index=0&email=email1&excludeFromCampaigns=bba6534270e6100619f8708f-c2,cca6534270e6100619f8708f-c3">
  <img src="https://core.helloretail.com/serve/tile/image?template=aaa6534270e6100619f8708f&campaign=c1&index=0&email=email1&excludeFromCampaigns=bba6534270e6100619f8708f-c2,cca6534270e6100619f8708f-c3">
</a>
<h2>Campaign 2</h2>
<a href="https://core.helloretail.com/serve/tile/click?template=bba6534270e6100619f8708f&campaign=c2&index=0&email=email1&excludeFromCampaigns=aaa6534270e6100619f8708f-c1,cca6534270e6100619f8708f-c3">
  <img src="https://core.helloretail.com/serve/tile/image?template=bba6534270e6100619f8708f&campaign=c2&index=0&email=email1&excludeFromCampaigns=aaa6534270e6100619f8708f-c1,cca6534270e6100619f8708f-c3">
</a>
<h2>Campaign 3</h2>
<a href="https://core.helloretail.com/serve/tile/click?template=cca6534270e6100619f8708f&campaign=c3&index=0&email=email1&excludeFromCampaigns=bba6534270e6100619f8708f-c2,aaa6534270e6100619f8708f-c1">
  <img src="https://core.helloretail.com/serve/tile/image?template=cca6534270e6100619f8708f&campaign=c3&index=0&email=email1&excludeFromCampaigns=bba6534270e6100619f8708f-c2,aaa6534270e6100619f8708f-c1">
</a>
In the above example, you can see that:
- campaign1 excludes campaign2 and campaign3
- campaign2 excludes campaign1 and campaign3
- campaign3 excludes campaign1 and campaign2
Once you have added excludeFromCampaigns to both the image URLs and the links, paste the snippet into your provider's HTML editor and save.
Code snippet: Exclude specific product(s) directly
To exclude specific products from a campaign, add the excludeProductNumbers parameter to each link and image URL.
The excludeProductNumbers parameter accepts a comma-separated list of product numbers. Products that match these numbers are excluded and will not be shown.
Apply this parameter to all products in the campaign.
Using custom customer id
If you do not want to use email as the identifier, you can use your own internal customer ID.
First, set your customer ID using our JavaScript SDK. See the example here. This identifies cookies using your customer ID instead of email.
When copying the Newsletter Content code snippet, make the following modification. The original snippet will look similar to:
<a href="https://core.helloretail.com/serve/tile/click?template={your template id};campaign={your campaign id}&index=0&**email**\={the email of the receiver}">
<img src="https://core.helloretail.com/serve/tile/image?template={your template id}&campaign={your campaign id}&index=0&**email=**{the email of the receiver}" width="298" height="350">
</a>
Replace the userEmail attribute with customerId, so it becomes:
<a href="core.helloretail.com/serve/tile/click?template={your template id};campaign={your campaign id}&index=0&**customerId**\={your own customer id}">
<img src="core.helloretail.com/serve/tile/image?template={your template id}&campaign={your campaign id}&index=0&**customerId**\={your own customer id}" width="298" height="350">
</a>
If you have any questions or need any help in the process, please feel free to reach out to our support team here
Need a custom template?
If you need an even more customized template for your product recommendation views, then please feel free to reach out to our support team here. We can discuss the potential options to get a customized template for your product recommendation view.