 Avg. 3 min read
 How to Set Up Pages for DanDomain Classic
This guide explains how to set up Pages with the DanDomain Classic platform.
For an in-depth introduction to Pages read this guide here.
For the Pages API documentation check here.
There are three integration methods for setting up Pages:
Each method has its own guide.
Set up of Pages for DanDomain Classic
Follow these steps to set up Pages in DanDomain Classic.
Note
The DanDomain Advanced Designer app must be installed before you continue. Pages requires access to the design templates provided by this app.
Installing the Hello Retail JavaScript with support for Pages
- Navigate to "Indstillinger -> Site" in your DanDomain Classic admin panel.
- Locate the webshop where you want to add the JavaScript and click the small edit icon

- Add the following JavaScript snippet. It should replace any previous Hello Retail JavaScript snippet you have installed:
<script>
  const url = window.location.href.split('?')[0] + "?rawjson=1";
  fetch(url)
  .then(response => response.json())
  .then(data => {
    const productList = data.productList;
    if (productList) {
      const { settings } = productList;
      const div = $("REPLACE_WITH_ID_OF_THE_PAGES_DIV"); // Replace with your ID of the container
      if (settings.news !== "") {
        div.attr('data-filters', '{"extraData.isNew": true}');
      } else if (settings.specialoffer !== "") {
        div.attr('data-filters', '{"isOnSale": true}');
      } else if (settings.productCatID !== "") {
        div.attr('data-filters', `{"extraDataList.categoryIds": "${settings.productCatID}"}`);
      }
    }
    loadHR();
  });
</script>
<script async src="https://helloretailcdn.com/helloretail.js"></script>
<script>
  function loadHR() {
      window.hrq = window.hrq || [];
      hrq.push(['init', {}]);
      hrq.push(function(sdk) {
          fetch("/shop/ajaxwrapper.asp?fc=getsessionvaluesJSON")
          .then((response) => response.json())
          .then((basketData) => {
              var total = basketData.basketTotalProductPriceWithoutVat + basketData.basketTotalVat;
              if (total > 0) {
                  var productNumbers = basketData.basket.map(function(p) {
                      return p.productNumber.trim();
                  });
                  var quantities = basketData.basket.map(function(q){
                      return q.quantity;
                  });
                  var cartUrl = document.location.origin +
                      '/shop/showbasket.html?AddMultiple=1&ProductID=' +
                      productNumbers.join("|") +
                      '&Amount=' + quantities.join("|");
                  sdk.setCart({
                      total: total,
                      url: cartUrl,
                      productNumbers: productNumbers
                  });
              }
          });
      });
  }
</script>
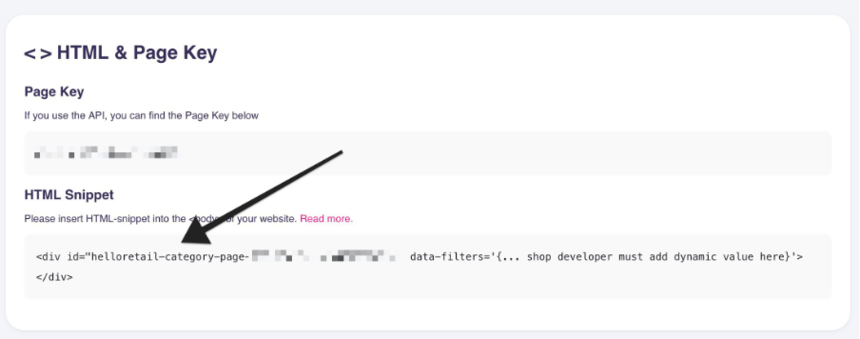
For REPLACE_WITH_ID_OF_THE_PAGES_DIV replace it with the ID of the Pages container, which you can find under your Pages configuration.
- Click "Gem".
Now allow the script to use category IDs and detect the current site.
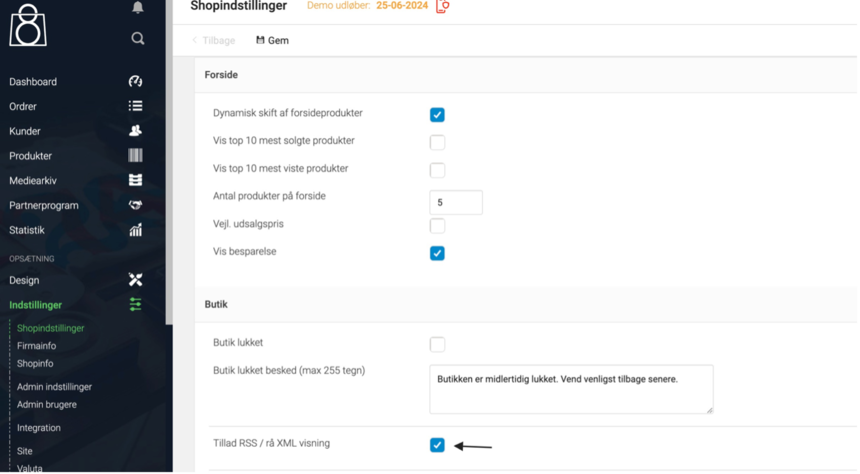
- Go to "Shopindstillinger -> Layout".
- Enable "Tillad Rss / rå XML visning".
To set the placement of the HTML snippet, and thereby the content of the category or brand page, follow the steps below:
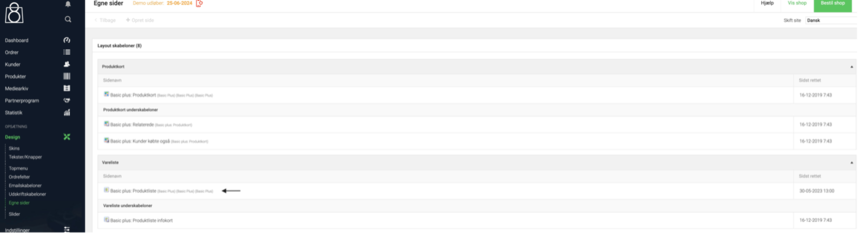
- Navigate to "Design" and select "Egne sider".
- Click on the ProductList
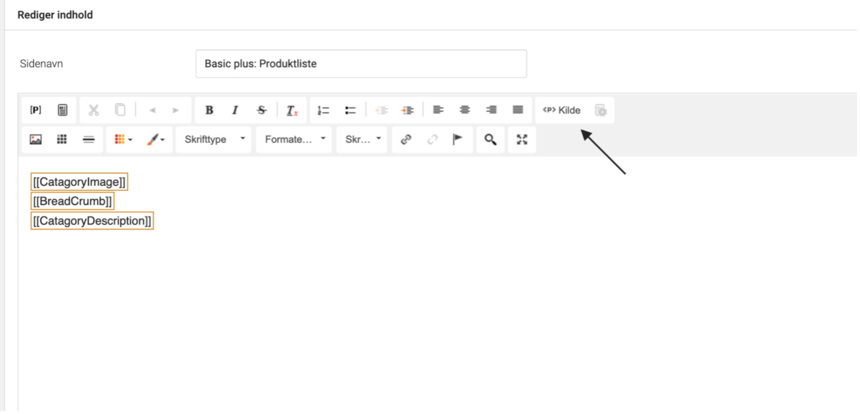
- After clicking on the ProductList, locate the "Kilde" button within the text editor.
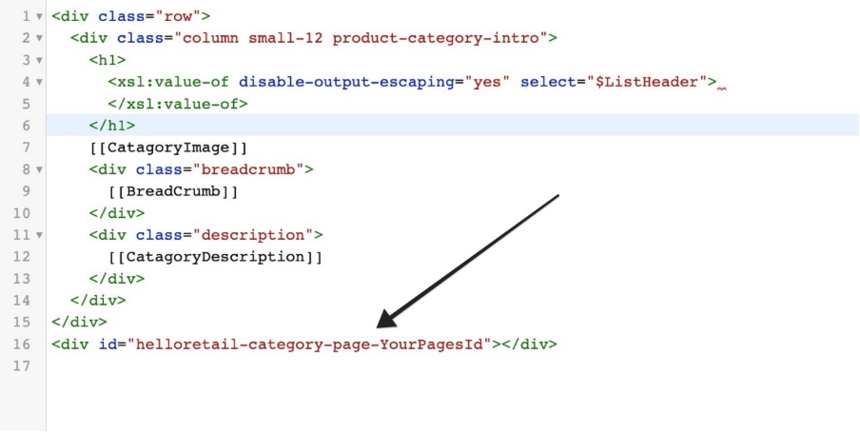
Below is an example of a file with the Pages snippet inserted. You can find the div you need to insert under your Pages configuration.
The design file on your end might look a bit different, depending on which customizations you have made to it.
Remember to save, and you are now done.