 Avg. 9 min read
 Magento 2 Installation Guide

Installing the Hello Retail Business Magento 2 Extension
This guide explains how to install the Hello Retail extension for Magento 2.
The extension is developed for Magento 2.2 and higher. It is generally compatible with 2.0 and 2.1 when PHP 7 is used.
Our category feed depends on API features introduced in Magento 2.2 and will not work on 2.0 or 2.1.
Purchase extension in Magento Marketplace
- Go to marketplace.magento.com and log in to your Magento account.
- Use the search bar and search for "hello retail" to find the extension.
- Click Add to Cart and complete checkout. After purchase, you can leave the Marketplace.

Installation via composer:
- The Hello Retail extension is available from the Magento repository at marketplace.magento.com. Ensure this repository is listed in your Magento project's composer.json (it is present by default).
- Add your Magento Marketplace public and private keys to Magento's auth.json if you have not done so. Make sure the credentials match the Marketplace account used to acquire the extension in the previous step.
- Install using the following commands:
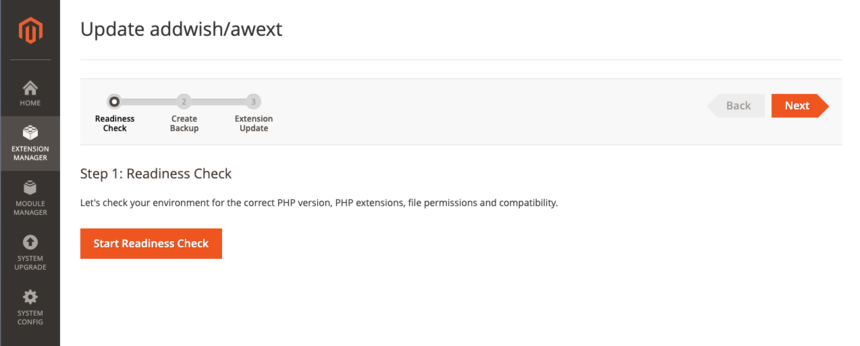
Install with Extension Manager (deprecated)
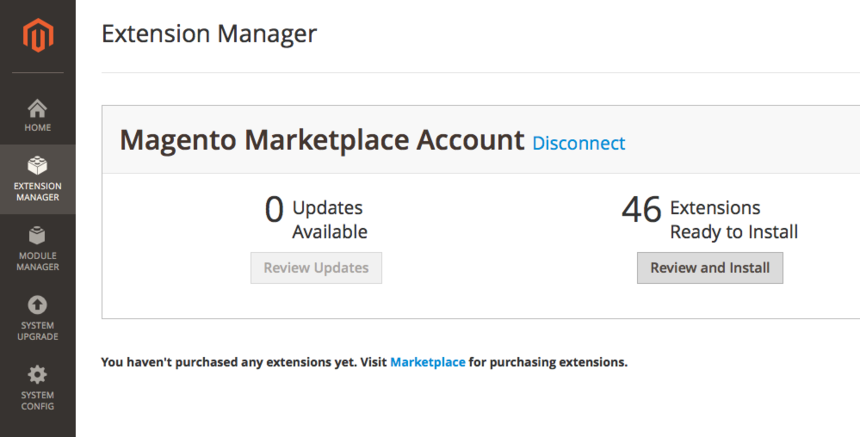
- In the Magento Admin, open the left-hand menu. Go to System, then click Web Setup Wizard.
- Open Extension Manager. Verify you are connected to the Magento Marketplace account that was used to acquire the Hello Retail extension.
-
Click Review and Install under Extensions Ready to Install.
-
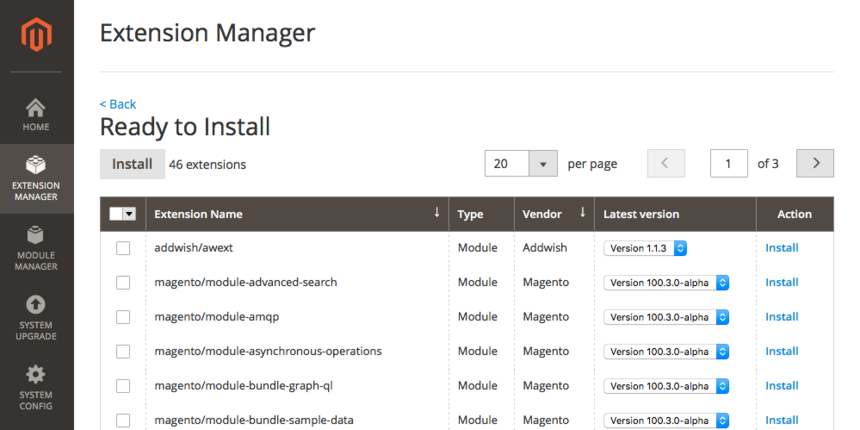
Find the extension in the list and click Install in the Action column.
-
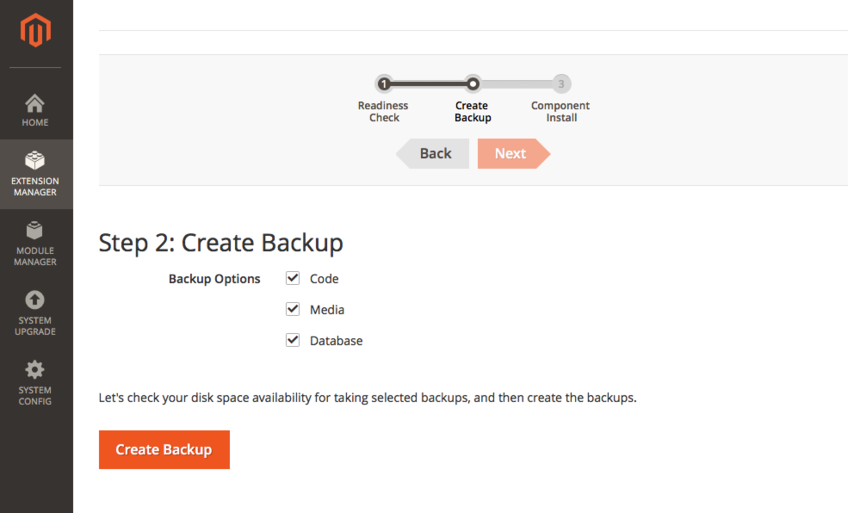
Consult your developer on whether to create a backup before proceeding.
-
Click Install. By default, the store enters maintenance mode during installation. Schedule installation for a low-traffic period.
- If installation succeeds, you will see a success message. If errors occur, forward the details to Support at support@helloretail.com and involve your developer.
- As a final step, open the module configuration page and complete the setup (see the end of this guide).
Installation via manual upload
If you are comfortable with FTP and have shell access, you can download and install the extension manually.
- Click here: to download version 1.1.79
- Navigate to
<magento\_main\_dir>/app/code/ .
If the code folder is not present, then you can create it and name the folder Addwish.
-
Inside the Addwish folder, create another folder called Awext so you end up with the following structure:
-
Unpack the zip file and copy all files inside the archive folder (not the folder itself) to:
<magento\_main\_dir>/app/code/Addwish/Awext
-
Run these commands in your shell:
-
As a final step, open the module configuration page and complete the setup (see the end of this guide).
Updating Hello Retail extension - Magento 2
If you use Hello Retail with your Magento 2 store, you likely installed the Hello Retail Magento 2 extension that automates setup and daily processes. When we fix bugs or update services, the extension is also updated. This section shows how to update it.
Update the extension using the same method you used for installation: Composer, Extension Manager, or manual upload.
Updating with Composer
If you originally installed the extension through Composer, update it with these commands:
composer update addwish/awext
php bin/magento setup:upgrade
php bin/magento setup:di:compile
php bin/magento cache:clean
Updating with Extension Manager (deprecated)
Navigate to Extension Manager and locate addwish/awext in the list of extensions.
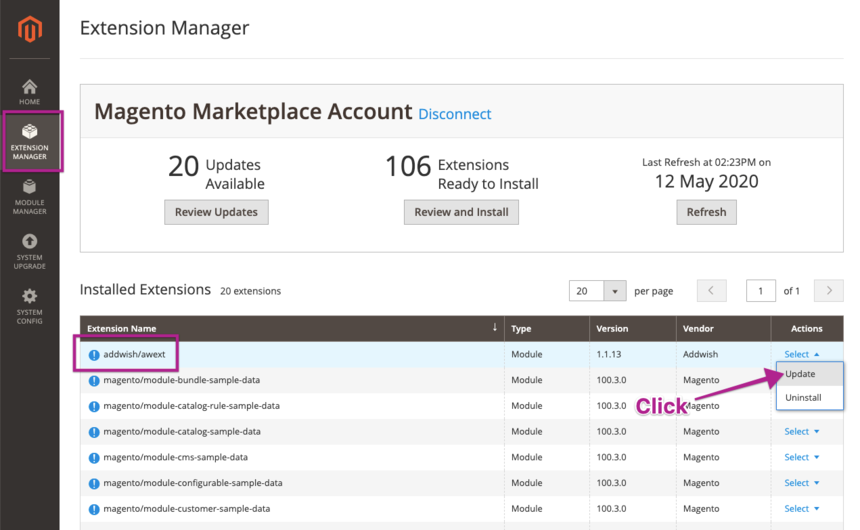
Click Update and follow the wizard to complete the update.
Manual upload
The process is the same as the original manual installation, but overwrite existing files with the updated versions. You can find the manual installation guide here.
Configure the module settings:
Navigate to Stores -> Configuration and open the Hello Retail module configuration page.
Here you can enable or disable the module and manage individual feature settings.
This figure shows the interface for the General Settings option (see below)

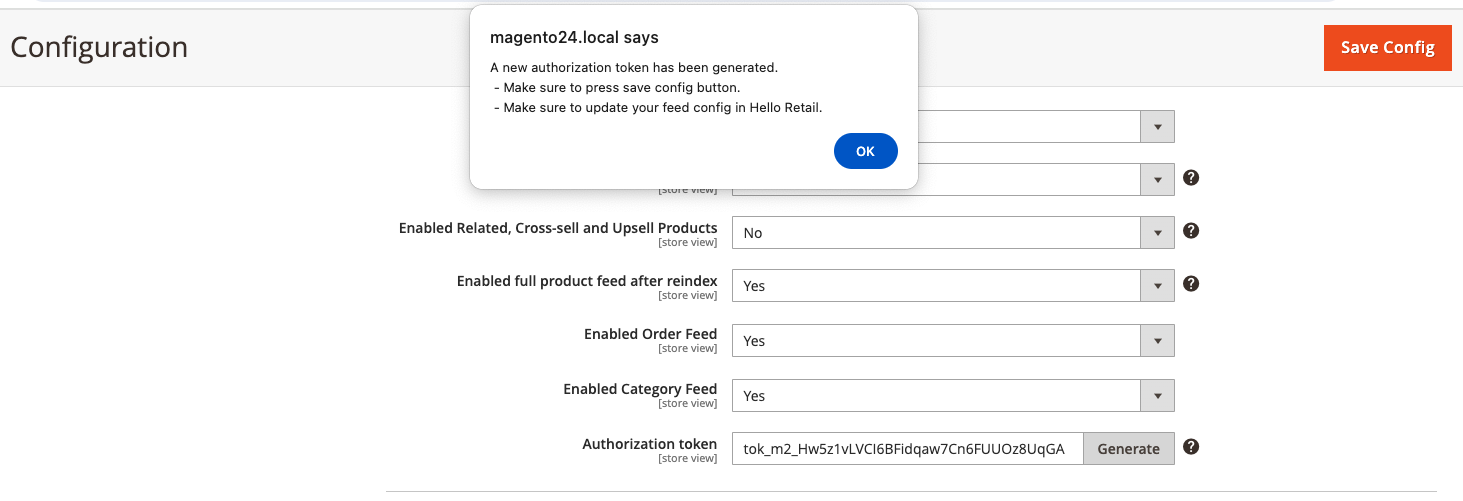
Feeds authorization:
All feeds require Bearer token authorization. Copy the token from the Magento configuration and add it as a request header in your feed configuration in Hello Retail.
If your feed is managed by Hello Retail, contact Support and we will help set it up.
See "Adding a request header to a feed" in the feed configuration tool guide for how to add the header.
To rotate the token, click Generate and then click Save Config.
Category Pages Content Feature:
For Category Pages Content, you can use either the General Settings (see figure above), configured in the module settings. This includes:
- Enabled Hello Retail Category Pages. This is the main switch. If set to Yes, the Pages feature is enabled. If set to No, Pages is disabled regardless of other settings.
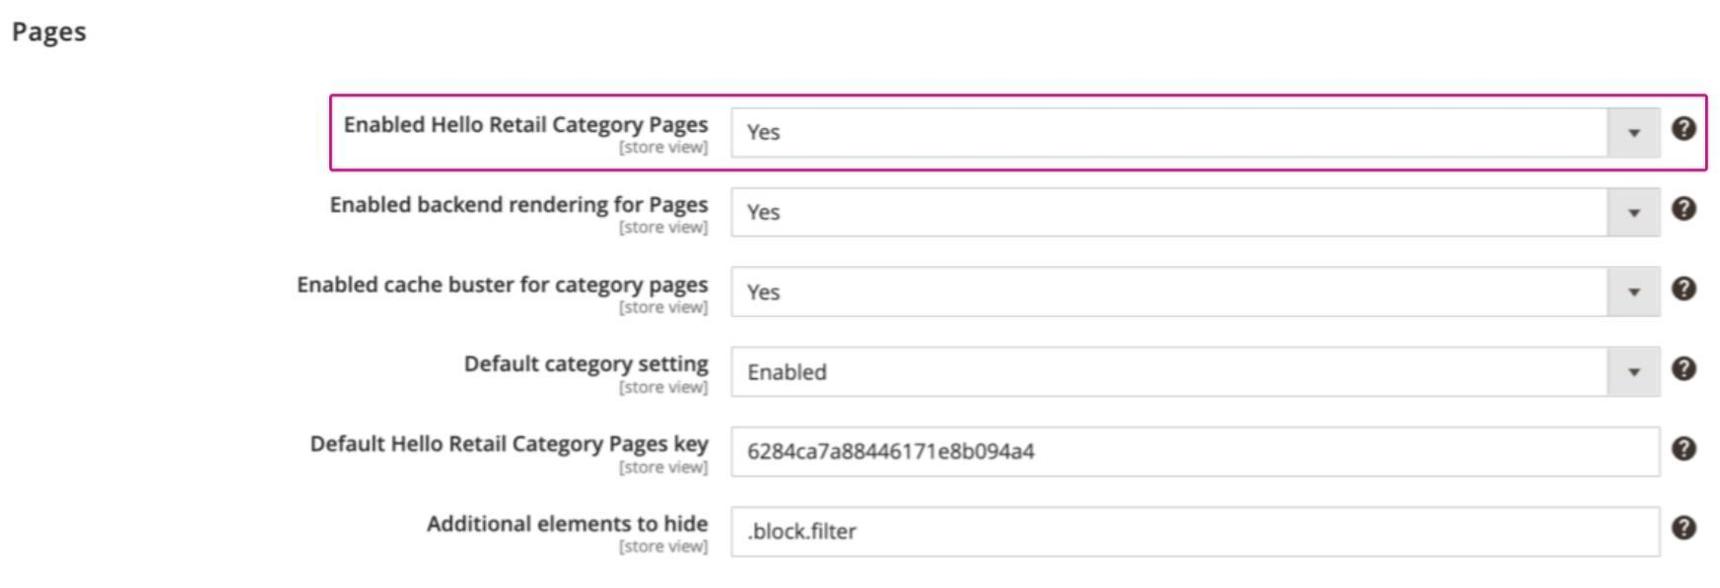
-
Enabled backend rendering for Pages. Enable or disable backend rendering for Pages content. By default, the content is rendered on the frontend.
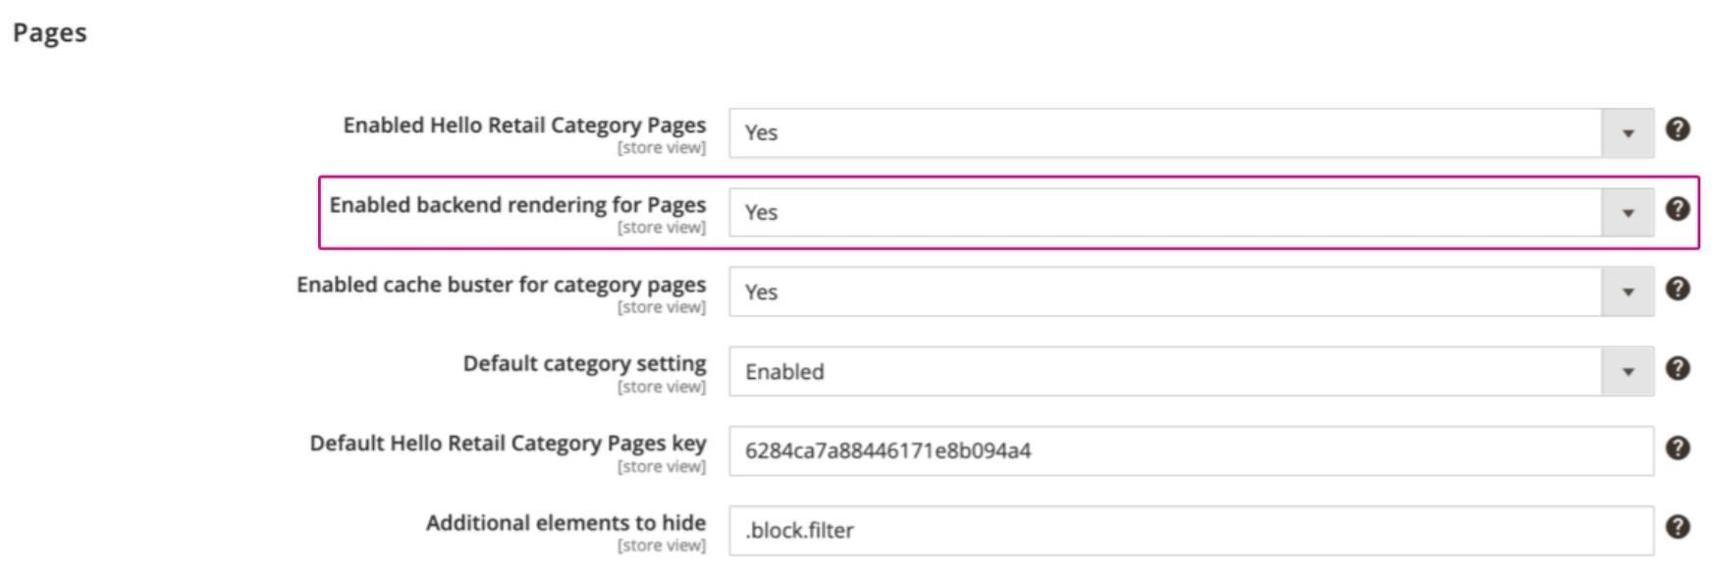
Backend rendering vs Frontend rendering
Choose based on required personalization and caching strategy:
- Backend rendering provides a native loading impression. For personalized content, you must disable cache on these pages, which impacts performance. If you only need non-personalized sorting (for example, by popularity), you can keep caching enabled and retain fast loading.
- Frontend rendering injects content after the initial load. It enables personalized content without disabling cache for the rest of the page, preserving overall page speed and navigation responsiveness.
-
Enabled cache buster for category pages. Disables caching when backend rendering is selected. When frontend rendering is selected, this setting is unavailable.
Caching must be disabled on category pages when content is personalized, which affects page load time.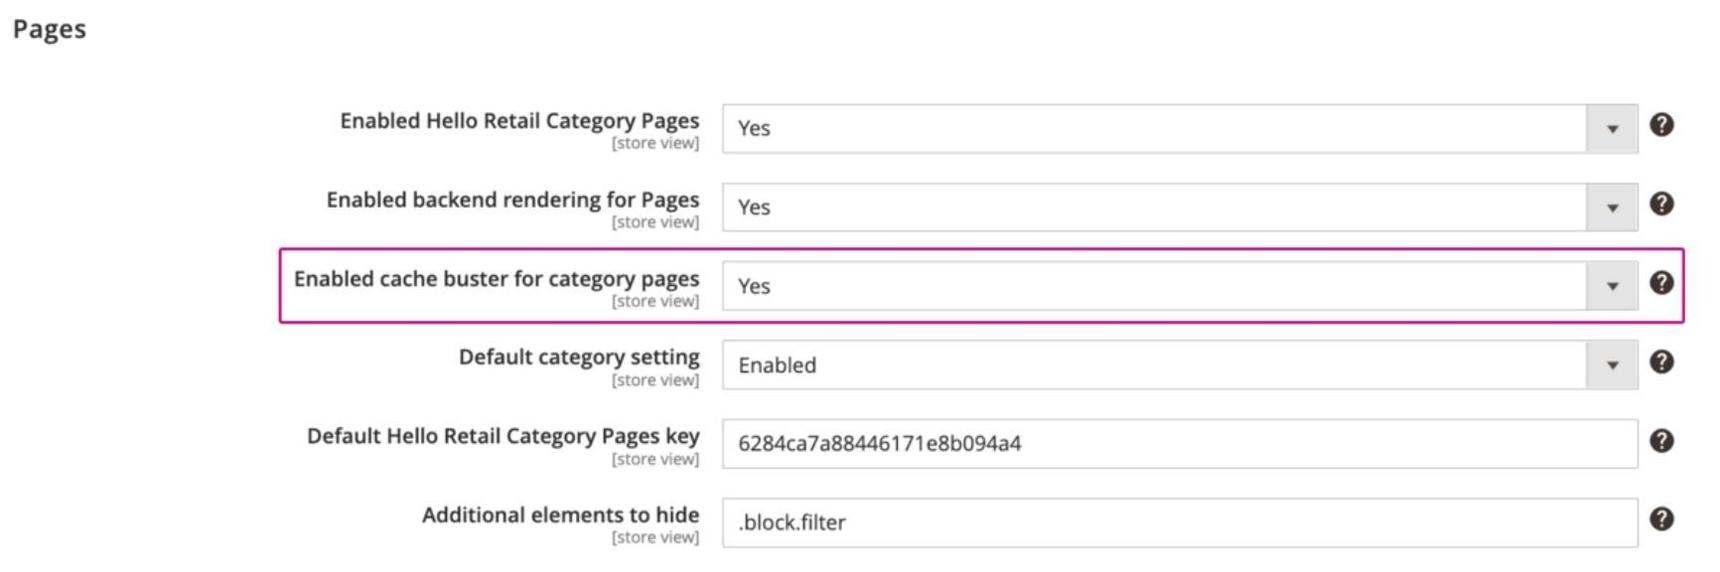
-
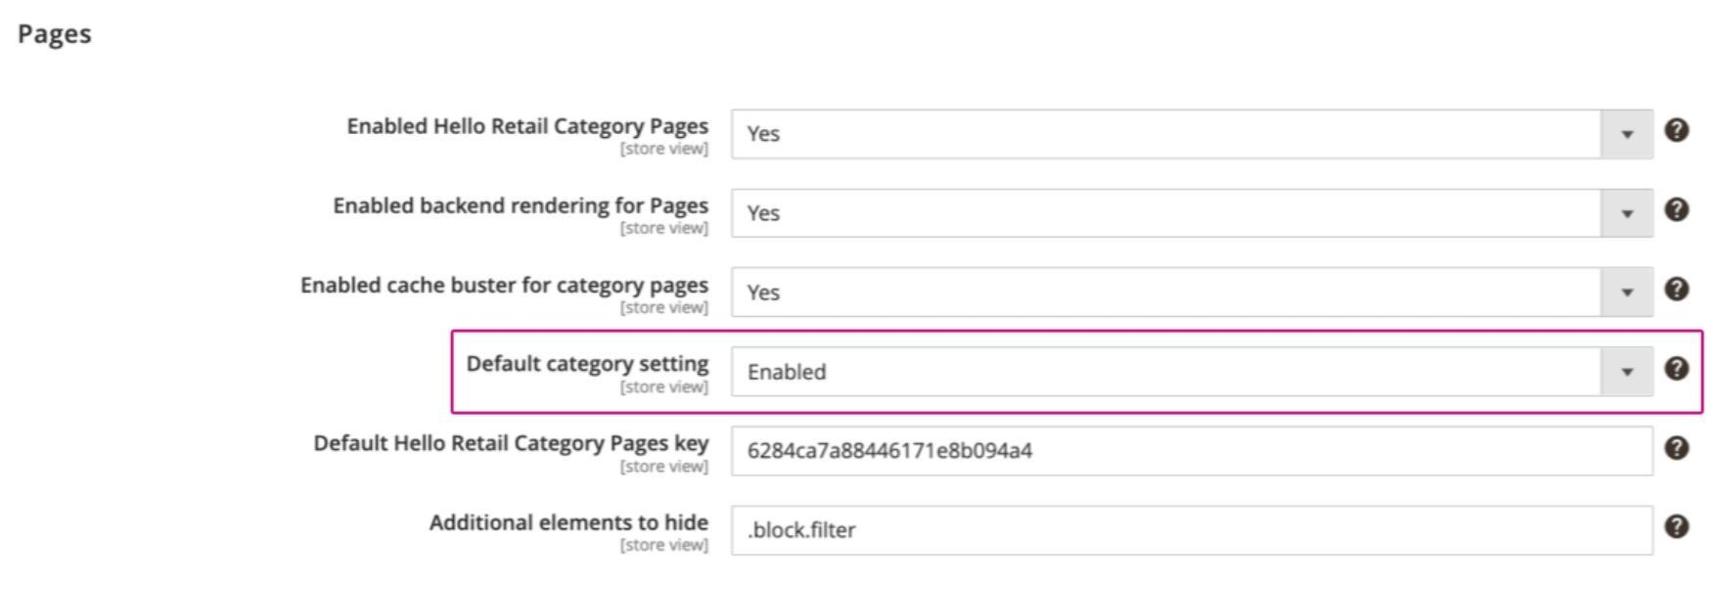
Default category setting. Sets the default behavior of Pages content on category pages: enabled or disabled.
- Set to Enabled to apply Pages content to all categories by default (you can exclude specific categories in the category settings).
- Set to Disabled to apply Pages content only to selected categories (you can include specific categories in the category settings).
This setting provides the default used by individual category pages. Each category page can use the default or override it (see Category Specific Settings).
-
Default Hello Retail Category Pages key. Sets a default Pages key for all categories that do not have a unique key specified. A common use case is to maintain one Pages configuration and reference its key here.
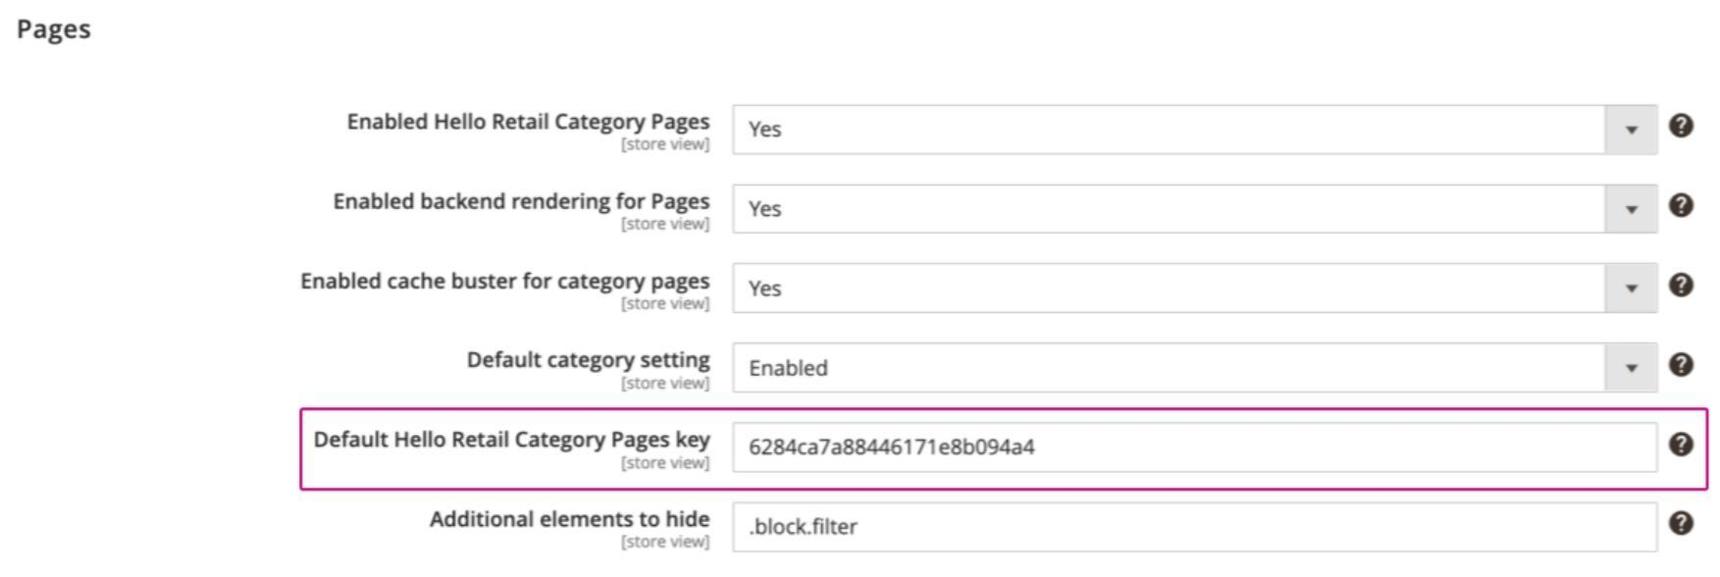
or Category Specific Settings:
You can also define settings per category. These are available in the "Hello Retail Category Pages Content" tab of each category:
- Enable on this category. Controls Pages content for this category with options: Enabled, Disabled, or Use default from configuration. Enabled turns the feature on for this category. Disabled turns it off. Use default from configuration applies the global default.
- Specific Hello Retail Pages Key. Sets a unique Pages key for this category. Use this to load content from a different Pages configuration. Leave empty to use the default key from General Settings.

Handling cookie policy
The Hello Retail Magento 2 extension does not include built-in cookie policy handling. If your region requires consent, you must implement it.
See our guide on Opt-in and -out of Tracking for an example approach.
Note
The extension automatically sends the init call. Ignore the first example in the opt-in guide that combines opt-in with init: hrq.push(['init', { trackingOptOut: boolean }]);
Configure your webshop in the Hello Retail Dashboard
After installing the extension and completing the onboarding flow, configure your webshop in the Hello Retail Dashboard. See this guide: