 Avg. 12 min read
 Shopify Installation Guide
In this guide, you will set up Hello Retail with Shopify, including API credentials, tracking and conversion scripts, and a blank page for search.
New Process from January 1st 2026
Shopify has changed the way that it is possible to create custom apps from the legacy way to their new Dev Dashboard. The Process described below is taking into account these changes. All existing apps will not be impacted by this change.
Creating API credentials for Hello Retail:
The API credentials allow Hello Retail to synchronize your shop's products and categories with our database to keep content up to date. They are also used to read order data for product relations and services such as triggered emails.
You must create a private app for Hello Retail. If needed, you can read Shopify's documentation on custom apps here.
Follow the steps below:
- Log in to your Shopify account.
-
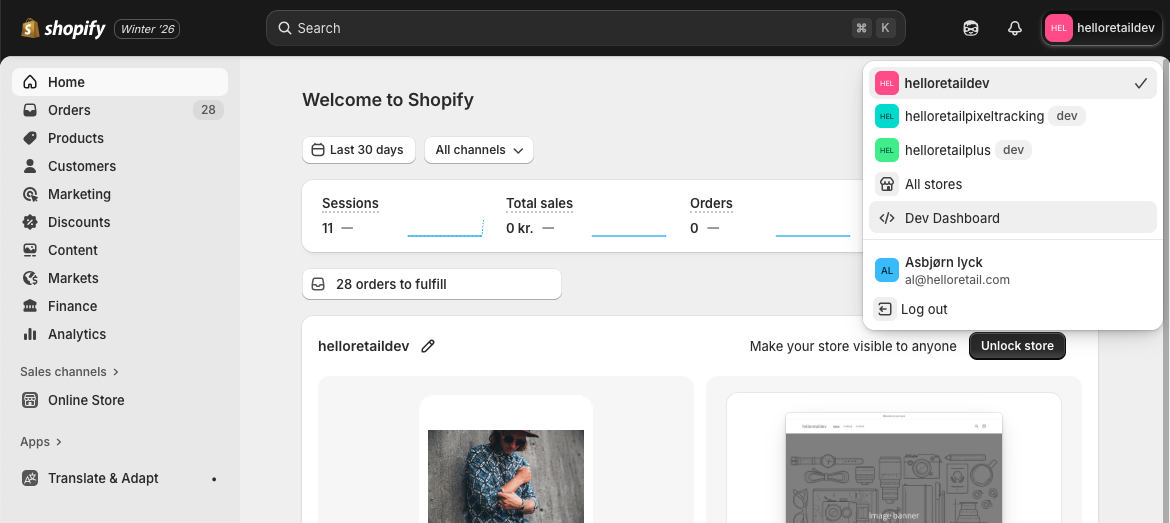
On the dashboard, click on the shop icon in the top right corner. In there click Dev Dashboard
-
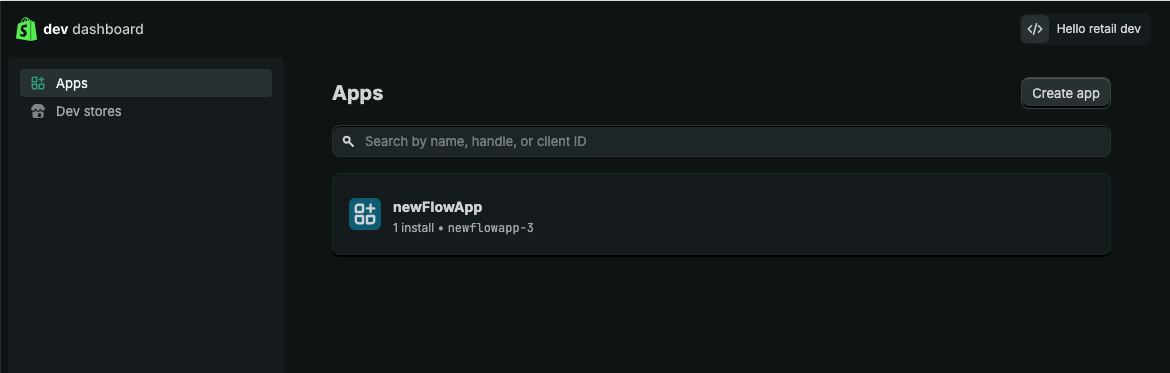
In this view, click Create New App.
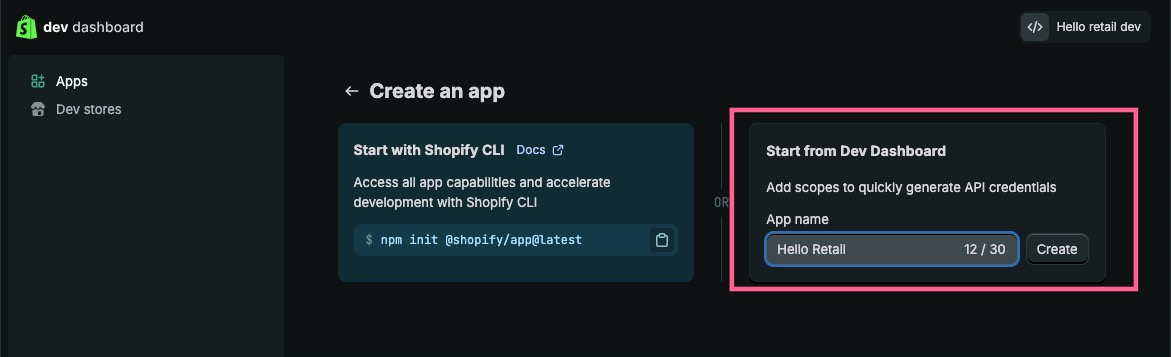
- Choose the option Start from Dev Dashboard and give your app a name .
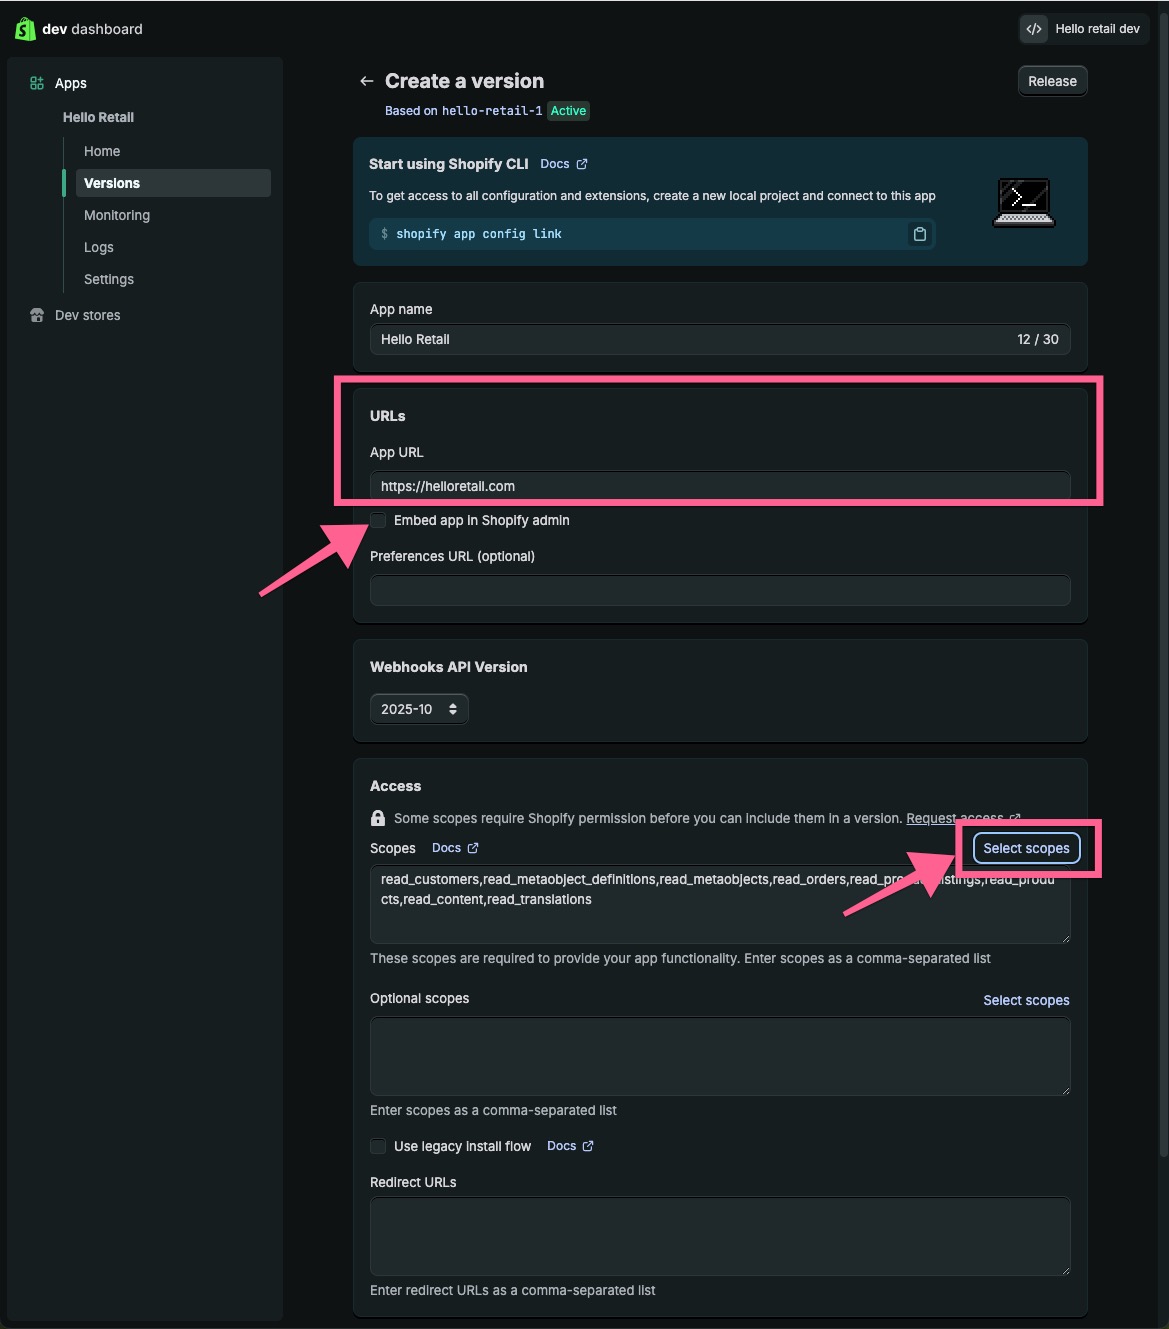
- In the following view add https://helloretall.com/ as an app URL, deselect Embed Shop in Shopify Admin and finally click on Select Scopes.
-
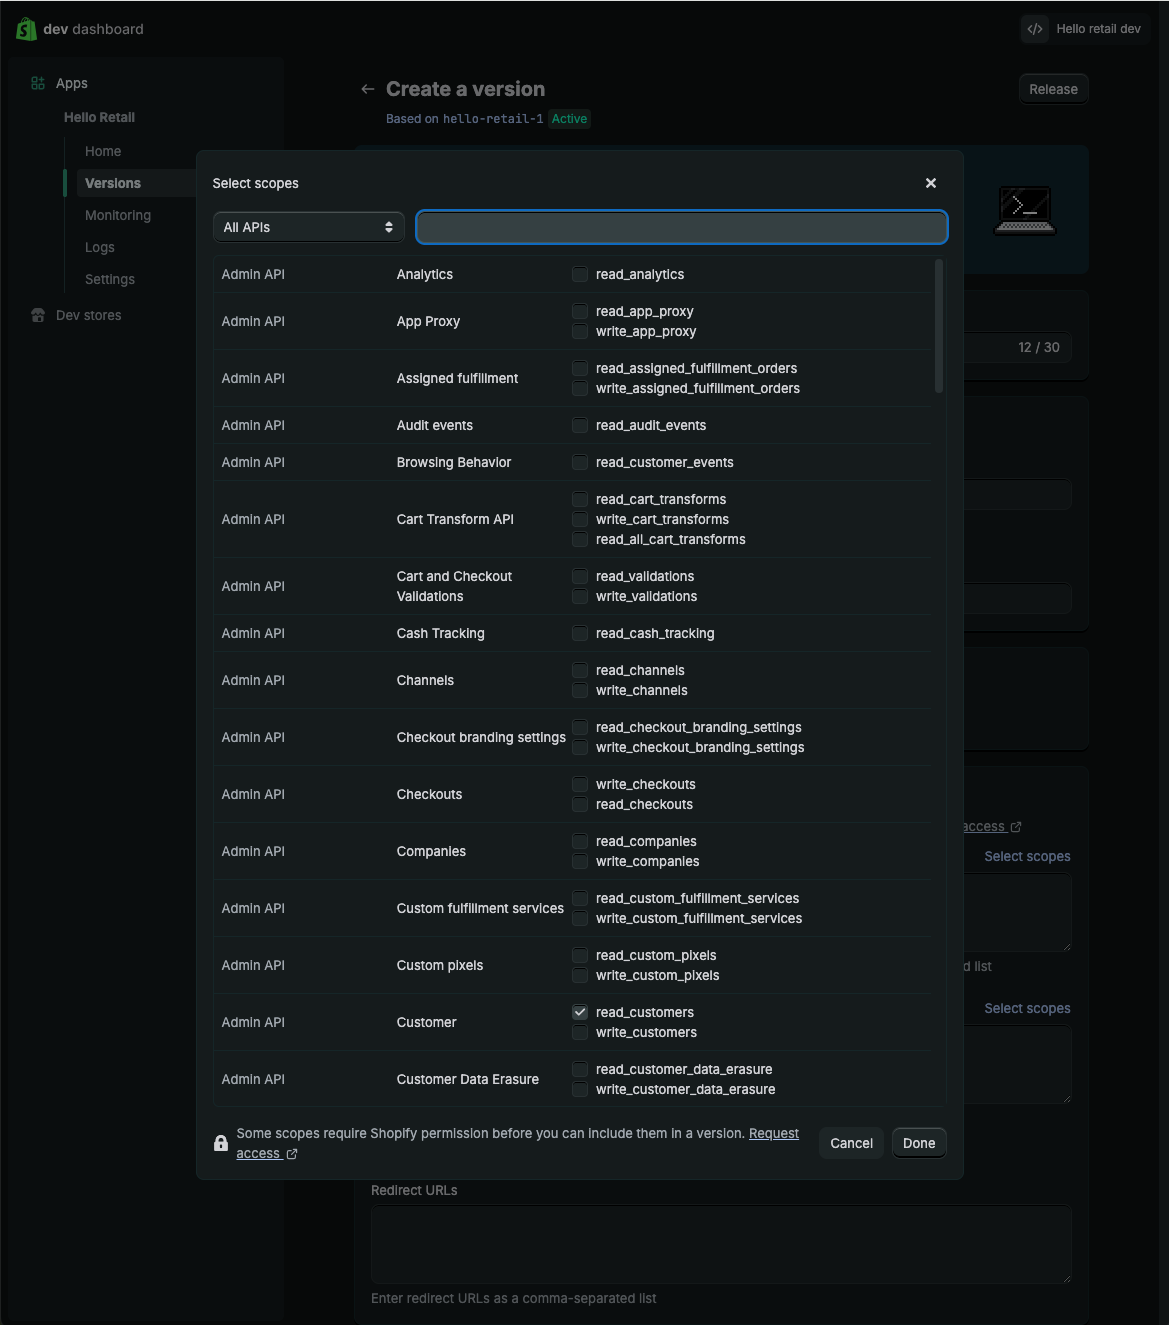
In the popup, search for the following scopes and activate them:
- read_customers
- read_metaobject_definitions
- read_metaobjects
- read_orders
- read_product_listings
- read_products
- read_content
- read_translations
 7. Click Release on the top right corner of the page, which will open the following pop-up.
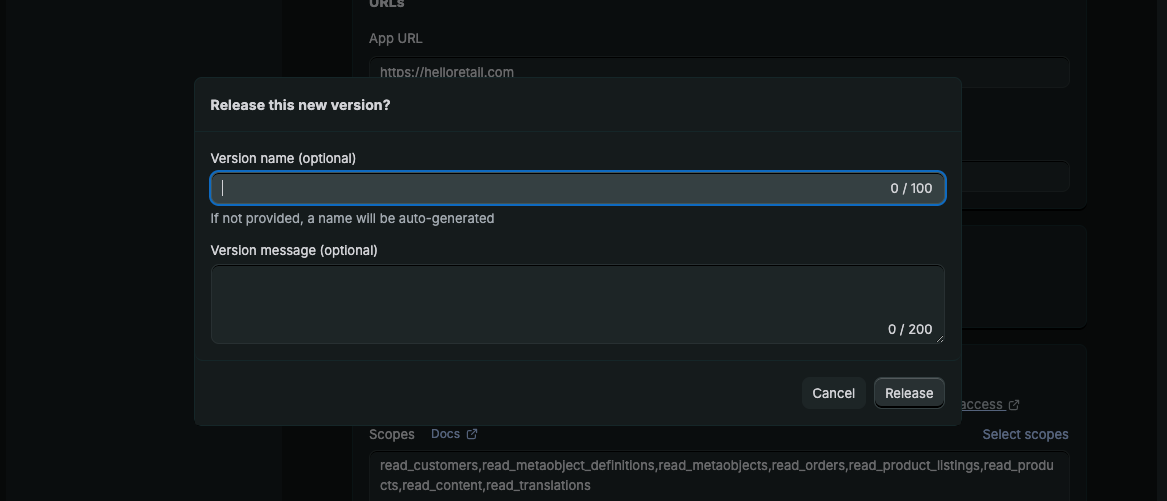 8. Optionally you can add a Name and message to the first version before releasing it
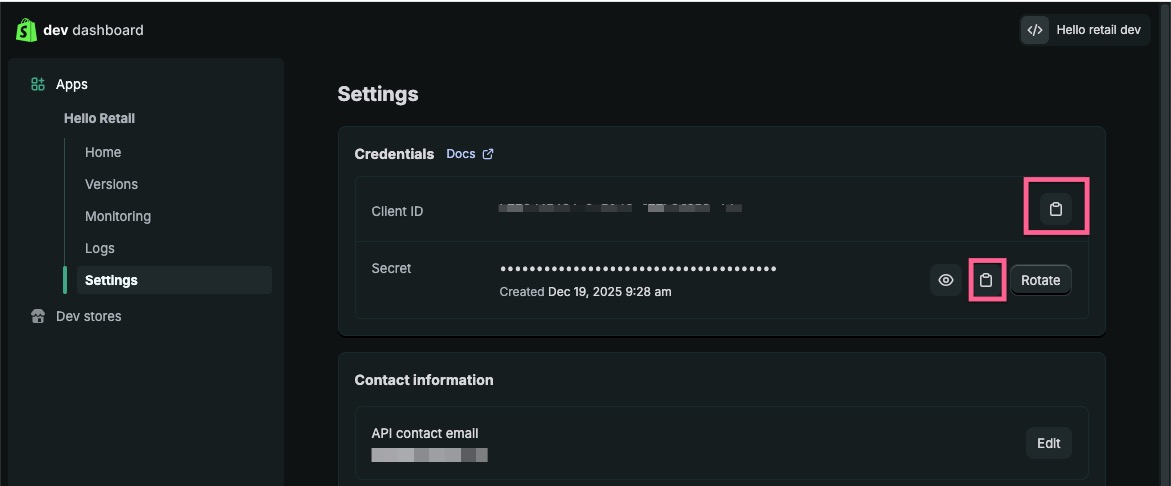
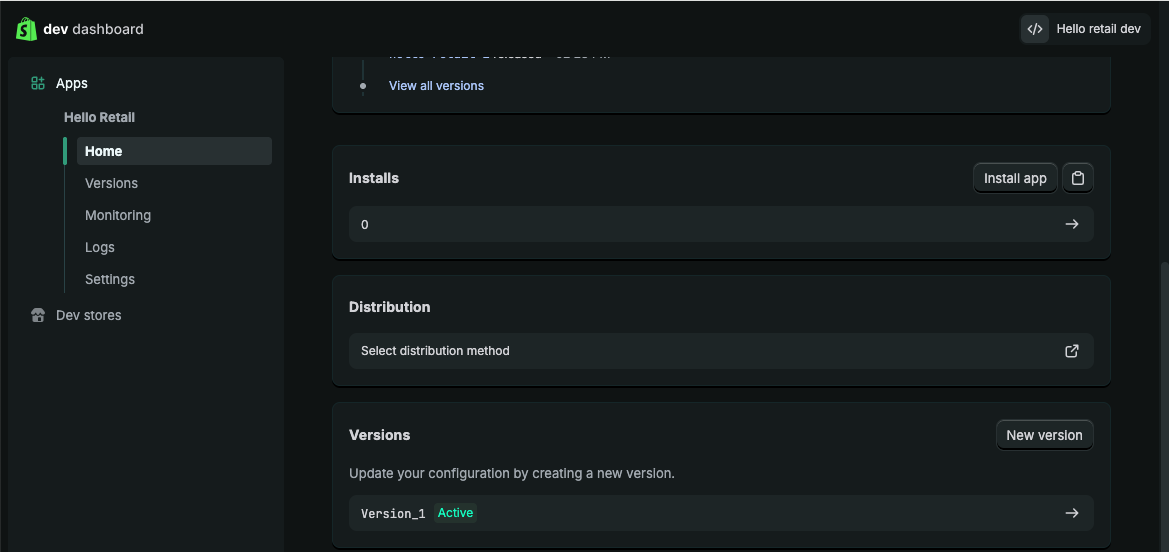
 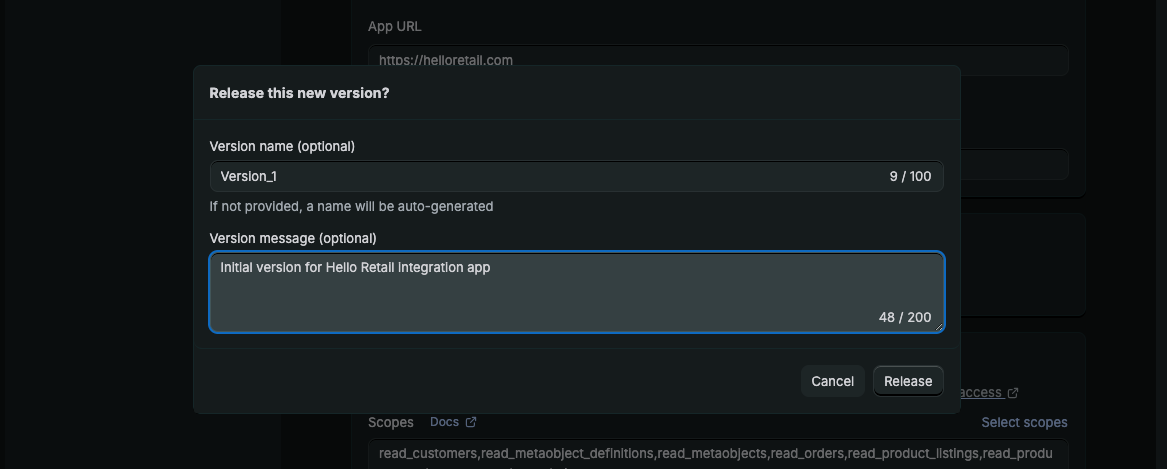 9. After that navigate to Settings, where you will find the Client ID and Secret, which you will need within Hello Retail to authenticate the app.
 10. Navigate to Home and click on Install App.
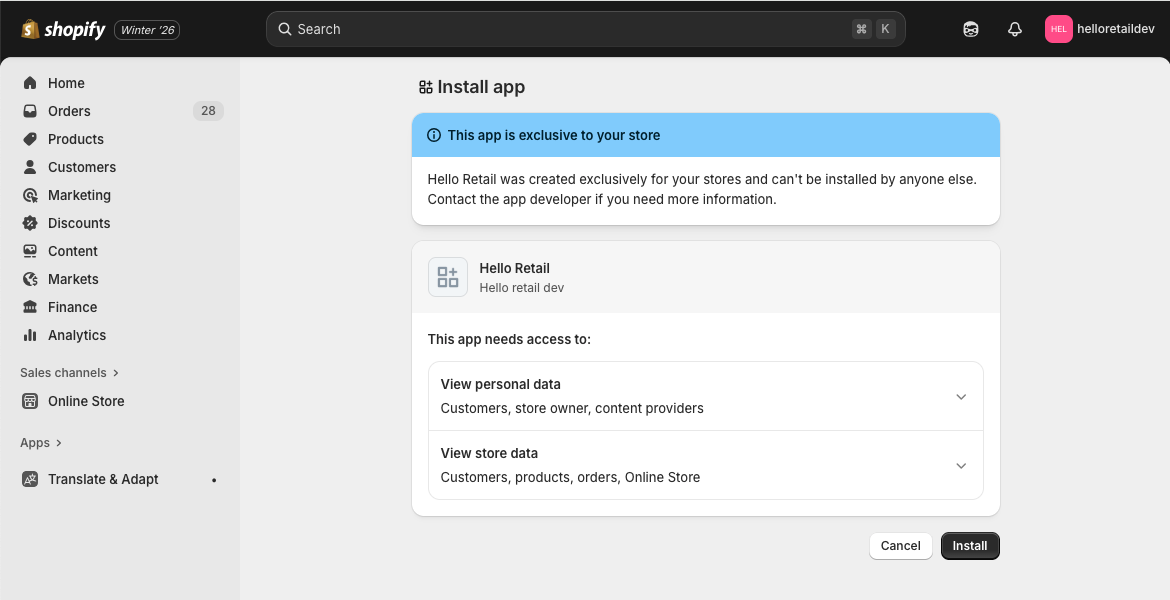
 11. Click the install button on the next view to finish up the installation
 12. Send the Client ID and the Secret you copied earlier to support@helloretail.com with the following details:
 - Client ID
- Secret
- Your Shopify store name (xxx.myshopify.com)
Inserting the Helloretail.js script
This section shows how to insert the Hello Retail script on your pages.
Log into the Admin panel of your Shopify webshop: shopify.com/login.
- On the dashboard, open the left-hand menu and click Online Store.

- From the drop-down menu, click Themes.

- On the right-hand side of your active theme, click Actions.

- From the drop-down menu, click Edit code.

- In the left menu, open the Layout folder and click theme.liquid. An editor window will open.

- In the editor, scroll to the bottom and locate the closing
</body>tag.
Copy the following snippet and paste it on a new line directly above the closing tag.
<script async src="https://helloretailcdn.com/helloretail.js"></script>
<script>
    let helloRetailInitParams = {};
    if (Shopify.country) {
        switch (Shopify.country) {
            case "US":
                helloRetailInitParams.websiteUuid = "YOUR_US_WEBSITE_UUID";
                break;
            case "DK":
                helloRetailInitParams.websiteUuid = "YOUR_DK_WEBSITE_UUID";
                break;
        }
        // ignore if the snippet was inserted without updating the websiteUuid.
        if (helloRetailInitParams.websiteUuid && helloRetailInitParams.websiteUuid.startsWith("YOUR_")) {
            delete helloRetailInitParams.websiteUuid;
        }
    }
    if (Shopify.customerPrivacy) {
        let hr_trackingIsAllowed = Shopify.customerPrivacy.analyticsProcessingAllowed() && Shopify.customerPrivacy.marketingAllowed();
        if (!hr_trackingIsAllowed) {
            helloRetailInitParams.trackingOptOut = true;
        }
    }
    if (Shopify.currency && Shopify.currency.active && Shopify.currency.rate) {
      let date = new Date();
      date.setTime(date.getTime() + (60 * 24 * 365 * 60 * 1000));
      let domain = window.location.host;
      if (domain.indexOf("www.") === 0) {
          domain = domain.substring(4);
      }
      document.cookie = "hello_retail_currency" + "=" + encodeURIComponent(JSON.stringify(Shopify.currency))
        + "; expires=" + date.toGMTString()
        + ";domain=." + domain
        + ";path=/;samesite=lax";
    }

    window.hrq = window.hrq || [];
    hrq.push(["init", helloRetailInitParams]);

    document.addEventListener("visitorConsentCollected", (event) => {
        let hr_trackingIsAllowed = Shopify.customerPrivacy.analyticsProcessingAllowed() && Shopify.customerPrivacy.marketingAllowed();
        hrq = window.hrq || [];
        hrq.push(function(sdk) {
            sdk.setTrackingOptOut(!hr_trackingIsAllowed);
        });
    });
</script>
Note
The websiteUuid selection based on Shopify.country is only required if your Hello Retail setup uses separate websites per market or language. Shopify can serve multiple languages on one domain, but Hello Retail requires separate websites. If your configuration is single market or language, you can ignore this section. You can use Shopify.locale instead of Shopify.country if that aligns with your Hello Retail configuration. If you do not update this code, the script will fall back to the default websiteUuid.
Note
The hr_trackingIsAllowed variable uses the combined result of Shopify.customerPrivacy.analyticsProcessingAllowed and Shopify.customerPrivacy.marketingAllowed. Update this logic if your consent model differs. Other available checks include Shopify.customerPrivacy.marketingAllowed and Shopify.customerPrivacy.saleOfDataAllowed.
Lastly, go to the top of the screen and click Save.

Inserting the Hello Retail tracking pixel:
This section enables cart and conversion tracking for Hello Retail. This data improves algorithms, content relevance, and features such as triggered emails.
Note
If you are updating an existing installation, remove the old scripts first. See: remove-old-shopify-scripts
- While logged in as Admin, click Settings at the bottom of the left-hand menu.
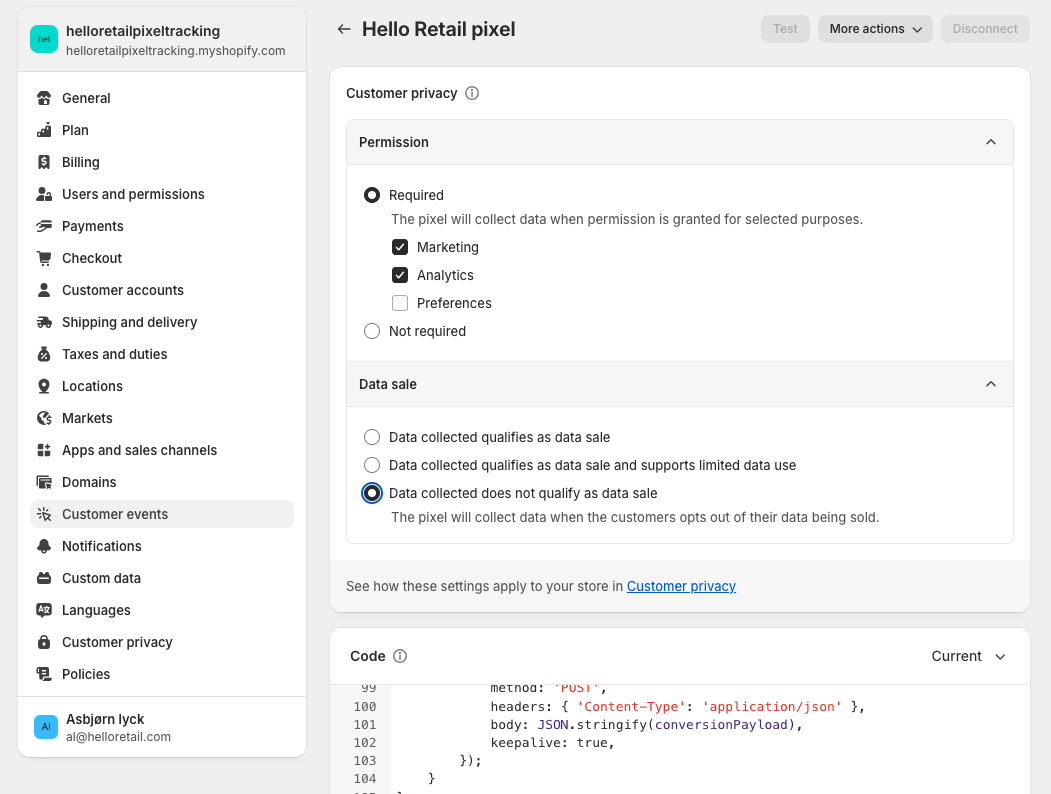
In the settings pop-up, open Customer events and click Add custom pixel in the top right corner.
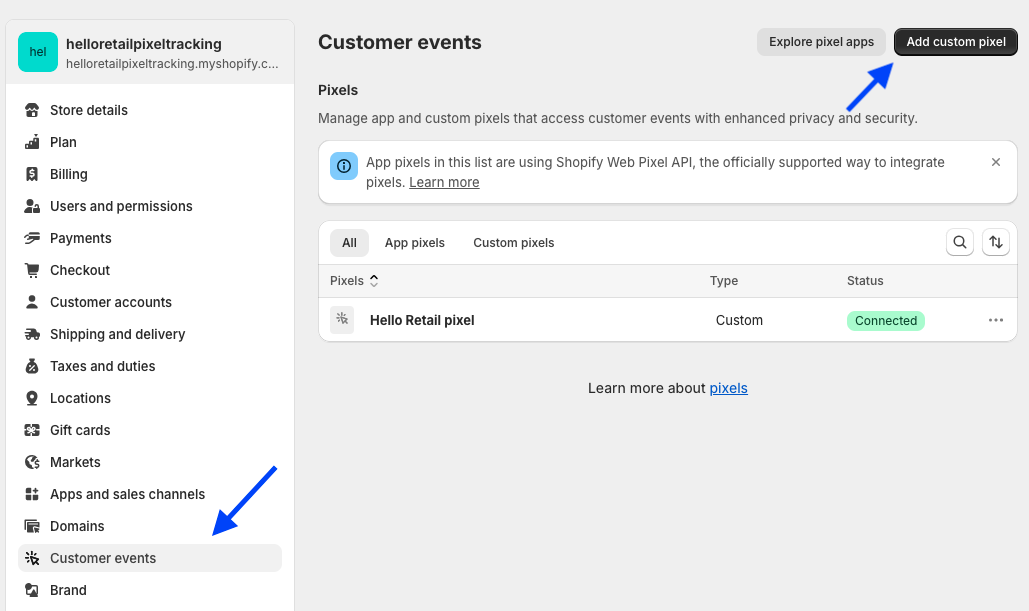
In the pop-up, enter a name such as "Hello Retail Pixel" and click Add Pixel. -
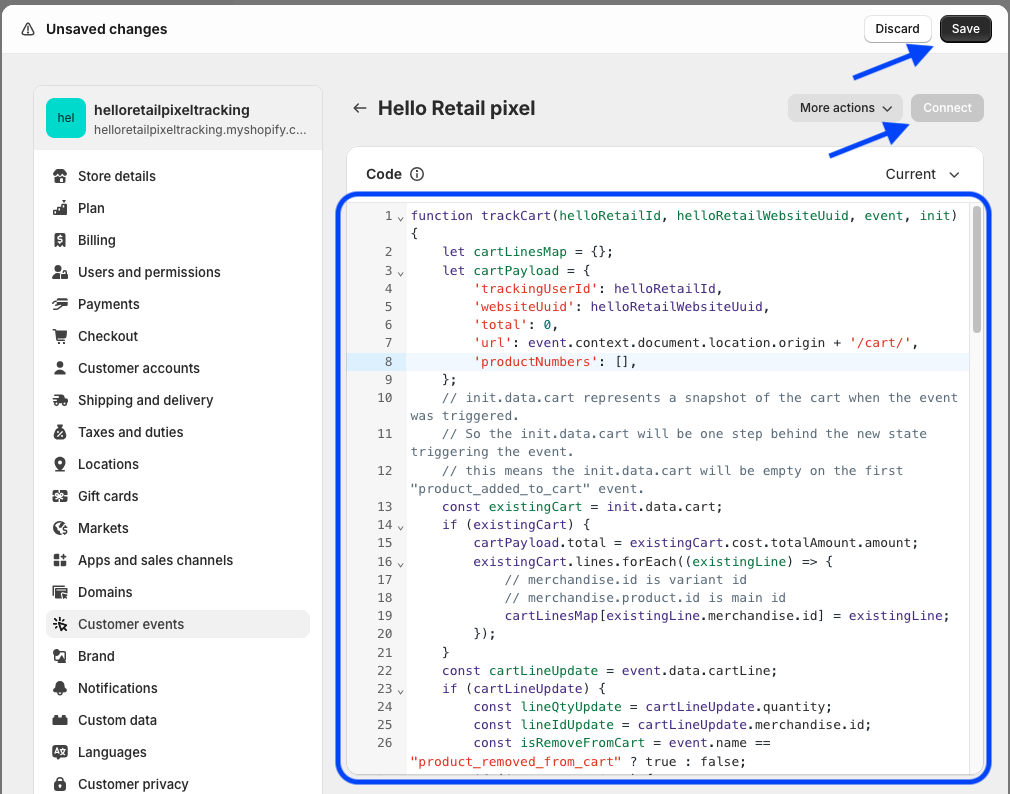
Copy the code snippet below and paste it into the code field for your new custom pixel. Click Save when done.
function trackCart(helloRetailId, helloRetailWebsiteUuid, helloRetailCurrency, event, init) { let cartLinesMap = {}; let cartPayload = { 'trackingUserId': helloRetailId, 'websiteUuid': helloRetailWebsiteUuid, 'total': 0, 'url': event.context.document.location.origin + '/cart/', 'productNumbers': [], }; // init.data.cart represents a snapshot of the cart when the event was triggered. // So the init.data.cart will be one step behind the new state triggering the event. // this means the init.data.cart will be empty on the first "product_added_to_cart" event. const existingCart = init.data.cart; let currencyCode = null; if (existingCart) { cartPayload.total = existingCart.cost.totalAmount.amount; currencyCode = existingCart.cost.totalAmount.currencyCode; existingCart.lines.forEach((existingLine) => { // merchandise.id is variant id // merchandise.product.id is main id cartLinesMap[existingLine.merchandise.id] = existingLine; }); } const cartLineUpdate = event.data.cartLine; if (cartLineUpdate) { currencyCode = cartLineUpdate.cost.totalAmount.currencyCode; const lineQtyUpdate = cartLineUpdate.quantity; const lineIdUpdate = cartLineUpdate.merchandise.id; const isRemoveFromCart = event.name == "product_removed_from_cart" ? true : false; if (isRemoveFromCart) { if (lineIdUpdate in cartLinesMap) { cartLinesMap[lineIdUpdate].quantity -= lineQtyUpdate; if (cartLinesMap[lineIdUpdate].quantity <= 0) { delete cartLinesMap[lineIdUpdate]; } } cartPayload.total -= cartLineUpdate.cost.totalAmount.amount } else { if (lineIdUpdate in cartLinesMap) { cartLinesMap[lineIdUpdate].quantity += lineQtyUpdate; } else { cartLinesMap[lineIdUpdate] = cartLineUpdate; } cartPayload.total += cartLineUpdate.cost.totalAmount.amount } } Object.values(cartLinesMap).forEach((currentCartLine) => { // merchandise.id is variant id // merchandise.product.id is main id cartPayload.productNumbers.push(currentCartLine.merchandise.product.id) cartPayload.url += (currentCartLine.merchandise.id + ":" + currentCartLine.quantity + ","); }); if (helloRetailCurrency && helloRetailCurrency.code == currencyCode) { cartPayload.total = Number(cartPayload.total / helloRetailCurrency.rate).toFixed(2); } else if (event.name == "checkout_started") { // Our currency doesnt match the current currency presented. // Most likely this is due to shopify auto changing the currency based on shipping address. // We have likely tracked a cart already at this point, so we can just ignore this event. // There is also the chance the customer will go back to the shop, // in which case our currency will be updated and we will be able to track correctly next event. return; } fetch('https://core.helloretail.com/serve/collect/cart', { method: 'POST', headers: { 'Content-Type': 'text/plain' }, body: JSON.stringify(cartPayload), keepalive: true, }); } function trackConversion(helloRetailId, helloRetailWebsiteUuid, helloRetailCurrency, event) { const checkoutData = event.data.checkout; if (checkoutData) { let totalInBaseCurrency = null; if (helloRetailCurrency && helloRetailCurrency.code == checkoutData.subtotalPrice.currencyCode) { // only set total when we are able to convert to base currency. totalInBaseCurrency = Number(checkoutData.subtotalPrice.amount / helloRetailCurrency.rate).toFixed(2); } let products = []; checkoutData.lineItems.forEach((lineItem) => { // lineItem.id is variant id // lineItem.variant.product.id is main id products.push({ 'productNumber': lineItem.variant.product.id, 'url': event.context.document.location.origin + lineItem.variant.product.url, 'quantity': lineItem.quantity, 'lineTotal': lineItem.variant.price.amount }) }); const conversionPayload = { 'trackingUserId': helloRetailId, 'websiteUuid': helloRetailWebsiteUuid, 'total': totalInBaseCurrency, 'orderNumber': checkoutData.order.id, 'email': checkoutData.email, 'products': products } fetch('https://core.helloretail.com/serve/collect/conversion', { method: 'POST', headers: { 'Content-Type': 'text/plain' }, body: JSON.stringify(conversionPayload), keepalive: true, }); } } function trackCustomerEmail(helloRetailId, helloRetailWebsiteUuid, event) { const checkoutData = event.data.checkout; if (checkoutData) { const trackingUserPayload = { 'trackingUserId': helloRetailId, 'websiteUuid': helloRetailWebsiteUuid, 'email': checkoutData.email, } fetch('https://core.helloretail.com/serve/collect/customerEmail', { method: 'POST', headers: { 'Content-Type': 'text/plain' }, body: JSON.stringify(trackingUserPayload), keepalive: true, }); } } async function getWebsiteUuid(browser) { const helloRetailState = await browser.sessionStorage.getItem('hello_retail_state'); let helloRetailWebsiteUuid = null; if (helloRetailState) { const helloRetailStateJSON = JSON.parse(helloRetailState); helloRetailWebsiteUuid = helloRetailStateJSON.website.uuid; } return helloRetailWebsiteUuid; } async function getHelloRetailId(browser) { return (await browser.cookie.get('hello_retail_id')) || null; } async function getHelloRetailCurrency(browser) { const currency = await browser.cookie.get('hello_retail_currency'); if (!currency) { return null; } const currencyObj = JSON.parse(decodeURIComponent(currency)); return {"rate":currencyObj.rate, "code":currencyObj.active}; } analytics.subscribe('product_added_to_cart', async (event) => { const helloRetailId = await getHelloRetailId(browser); const helloRetailWebsiteUuid = await getWebsiteUuid(browser); const helloRetailCurrency = await getHelloRetailCurrency(browser); if (helloRetailId && helloRetailWebsiteUuid) { trackCart(helloRetailId, helloRetailWebsiteUuid, helloRetailCurrency, event, init); } }); analytics.subscribe('product_removed_from_cart', async (event) => { const helloRetailId = await getHelloRetailId(browser); const helloRetailWebsiteUuid = await getWebsiteUuid(browser); const helloRetailCurrency = await getHelloRetailCurrency(browser); if (helloRetailId && helloRetailWebsiteUuid) { trackCart(helloRetailId, helloRetailWebsiteUuid, helloRetailCurrency, event, init); } }); analytics.subscribe('checkout_started', async (event) => { // This is used for cart tracking in the case of "direct to checkout". // also works as a failsafe in the case a user returns to the shop, // has an active cart and goes directly to checkout. const helloRetailId = await getHelloRetailId(browser); const helloRetailWebsiteUuid = await getWebsiteUuid(browser); const helloRetailCurrency = await getHelloRetailCurrency(browser); if (helloRetailId && helloRetailWebsiteUuid) { trackCart(helloRetailId, helloRetailWebsiteUuid, helloRetailCurrency, event, init); } }); analytics.subscribe('checkout_contact_info_submitted', async (event) => { const helloRetailId = await getHelloRetailId(browser); const helloRetailWebsiteUuid = await getWebsiteUuid(browser); if (helloRetailId && helloRetailWebsiteUuid) { trackCustomerEmail(helloRetailId, helloRetailWebsiteUuid, event); } }); analytics.subscribe('checkout_completed', async (event) => { // Shopify customer events will only fire if the customer has opted in. const helloRetailId = await getHelloRetailId(browser); const helloRetailWebsiteUuid = await getWebsiteUuid(browser); const helloRetailCurrency = await getHelloRetailCurrency(browser); if (helloRetailId && helloRetailWebsiteUuid) { trackConversion(helloRetailId, helloRetailWebsiteUuid, helloRetailCurrency, event); } }); -
Set the appropriate customer privacy settings and press Connect to publish the tracking pixel.
Note
If you removed an older installation before this step, make sure to follow this section to insert the general tracking script on your webshop.
Creating a Blank Page for the Hello Retail Search:
The following section is only relevant for setups for a full search.
Step 1: Navigate and click "Online store"

Step 2: Click sub-menu "Pages"

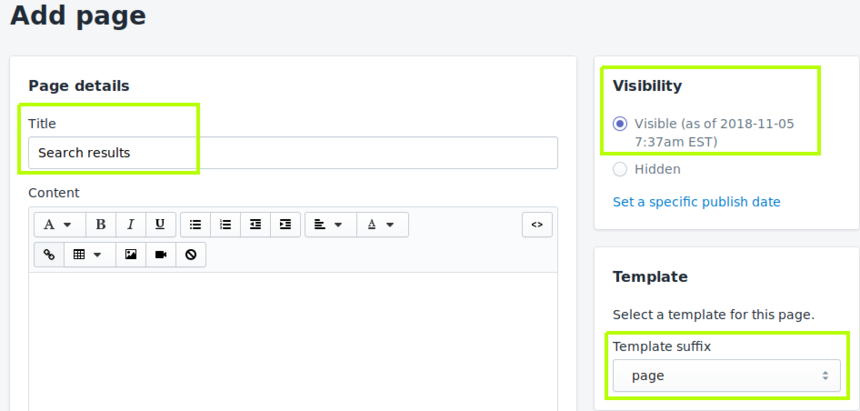
Step 3: Navigate to the top right corner and click the button "Add pages". A new page editor will appear.

Step 4: In the page editor, write a meaningful title, e.g., "Search results" in Title. Make sure "Visible" is selected under Visibility. Choose "page" under Template.
Step 5: Navigate to the bottom right corner and press "Save"

Step 6: You have now created a blank page for Hello Retail to display search results. After saving, navigate to the top of the page and click "View Page." This opens a new browser tab.

Step 7: Copy the page URL from your browser and share it with Hello Retail so we can finalize your full-page search.

Configure Webshop
After completing the platform installation and onboarding flow, configure your webshop. Follow this guide:
Updating Your Shopify Integration
The steps for updating your Hello Retail Shopify integration depend on the version of your current setup.
Legacy Integration (No Tracking Pixel)
If your integration uses a script in the “Additional Scripts” field of the checkout.liquid page (no tracking pixel):
- Follow the Remove Old Shopify Scripts guide to remove the legacy integration.
- Then follow the Shopify Integration Setup guide from the beginning to install the latest version.
Older Version of Current Integration (With Tracking Pixel)
If you are already using a tracking pixel but need to update:
-
API Credentials:
See Creating API Credentials for Hello Retail step 11. Ensure your API credentials include all required scopes. -
HelloRetail.js Script:
Verify the embedded script matches the latest version in this guide. Copy and replace to ensure accuracy. -
Tracking Pixel:
Ensure the tracking pixel implementation matches the current documentation. Copy and replace to update safely.