 Avg. 6 min read
Setting up Klaviyo
This article walks you through how to connect Product Agents to Klaviyo. The onboarding wizard will guide you through the full setup — Klaviyo flows and email templates are created automatically.
The setup covers 7 steps: connecting your Klaviyo account, choosing a permission source, setting a tone of voice, cloning a template, adding the Hello Retail content block, configuring your agents, and completing onboarding. Most setups take around 10–15 minutes.
Before you start
Make sure you have:
- Access to your Klaviyo account
- Permission to create and edit flows
- Permission to create and edit email templates
If you are working with an agency or partner, make sure they have the same level of access.
Step 1: Connect Klaviyo to Product Agents
The first step is to connect your Klaviyo account to Hello Retail.
- Go to Product Agents in Hello Retail
- Start the onboarding flow if you have not already done so
- Paste your Klaviyo API key when prompted
- Confirm the connection
Once connected, Hello Retail can send Product Agent messages to Klaviyo.
Required API permissions
Your Klaviyo API key must include permissions to:
- Read access to Lists, Segments, Profiles, Metrics & Campaigns
- Full access to Templates, Events & Flows
If the permissions are incomplete, the setup will stop and show an error message explaining what is missing.
Step 2: Choose a permission source
After connecting your Klaviyo account, you will be asked to select a permission source. This determines how Product Agents check whether a customer is allowed to receive emails.
You can choose either a list or a segment from your Klaviyo account.
When to use a list vs. a segment
Use a list when:
- You have a single, dedicated marketing consent list that all opted-in customers are added to (the most common setup)
- Your signup forms add subscribers directly to a Klaviyo list
- You want the simplest and most predictable setup — list membership is explicit and does not change unless a contact is manually added or removed
Use a segment when:
- You run multiple language domains and want to make sure each customer only receives emails in their language — for example, a segment scoped to your German-speaking subscribers
- You only want to contact customers who have been active recently — for example, customers who have opened an email or placed an order in the last 90 days
- You want to limit emails to customers who have actually opened emails before, rather than everyone who is subscribed
- You want to combine several conditions — for example, opted-in customers who have visited the site in the last 60 days and have not made a purchase
- You want to exclude specific customers from Product Agent emails without unsubscribing them from your other marketing — see the Excluding specific profiles section below
Segments in Klaviyo are evaluated dynamically. A customer may enter or leave a segment at any time as their profile data changes. With lists, membership is static until explicitly changed. If your permission logic is complex or frequently updated, segments offer more flexibility, but list-based permission is simpler to reason about and debug.
Step 3: Set your Tone of Voice
Next, set the tone of voice that Product Agents will use when generating email content. This controls the style and language of the AI-generated subject lines, preview texts, and body copy across all agents — for example, whether emails sound formal and brand-led or conversational and direct.
You can change this at any time from the Product Agents settings after onboarding, so it does not need to be perfect from day one.
Step 4: Select and clone a Klaviyo template
Product Agents use a single shared email template across all your flows. In this step, you select one of your existing Klaviyo templates to use as the base.
- Choose a template from the dropdown — Hello Retail loads all templates from your Klaviyo account
- Click Clone & Set Up
Hello Retail will make a copy of the template and rename it "[Template name] — Hello Retail". Your original template is not changed.
Step 5: Add the Hello Retail block to the template
After cloning, you need to add a Hello Retail universal content block to the cloned template. This block is what Product Agents use to inject personalised product content into each email.
- Click Open in Klaviyo editor to open the cloned template directly
-
In the content panel on the left side, click the Universal tab
-
Find any Hello Retail block in the panel and drag it into the template
- Click Exit in the top right — you can return to this page to continue once done
Hello Retail automatically detects when the template has been saved and moves the onboarding forward.
Note
The Hello Retail block controls the personalised product section of the email. You can still customise the surrounding layout, branding, header, and footer freely in Klaviyo.
Step 6: Set up your agents
With the template ready, you can now set up each Product Agent. On the Set up your agents screen, agents are grouped by category and each one has its own setup steps.
For each agent you want to activate:
1. Create the Klaviyo flow
Click Create Flow. Hello Retail automatically creates a dedicated Klaviyo flow for that agent — no manual configuration in Klaviyo is required.
Each agent gets its own flow. This means agent-level analytics are available in Klaviyo's native flow reporting out of the box.
2. Send a test email
Once the flow is created, send a test email to verify the setup.
- Select a recipient from your list of test email addresses
- Click Send Test Email
The test runs through the real Klaviyo flow. Your flow must be Live in Klaviyo for the test email to be delivered. No customers are contacted and no credits are consumed during testing.
If the test email does not arrive, the most common reasons are:
- The flow is still in draft mode in Klaviyo
- Smart Sending is blocking the email because the recipient was emailed recently
- The recipient address is missing consent
3. Activate the agent
Click Set Live to activate the agent. Once live, the agent will start processing events and scheduling emails automatically.
Note
You can skip activating agents during onboarding and do it later from the Agents dashboard. Test emails, custom prompts, Tone of Voice, and activation are all available after onboarding completes.
Repeat these steps for each agent you want to use.
Step 7: Complete onboarding
Once you have set up your agents, click Complete on the final screen. Product Agents will begin processing receipts and product views in real time and scheduling emails as matching events come in.
Any agents that were not set up during onboarding will show as not yet set up and can be configured from the Agents dashboard at any time.
You're all set
Product Agents will now process events and schedule emails automatically. Each agent sends through its own dedicated Klaviyo flow, and you can monitor upcoming messages from the Product Agents dashboard.
No further Klaviyo configuration is required for day-to-day use.
Using Trigger Filters in Klaviyo for Agent-Level Analytics
Because each agent gets its own dedicated Klaviyo flow during onboarding, agent-level analytics are available by default in Klaviyo's flow reporting.
If you have existing flows set up manually, or want to combine multiple agents into a single flow and use Trigger Filters to split them, you can configure that manually in Klaviyo.
To add a Trigger Filter:
- Open the flow in Klaviyo
- Click the Trigger
- Under Trigger Filters, click Add and select
messageTypefrom the dropdown
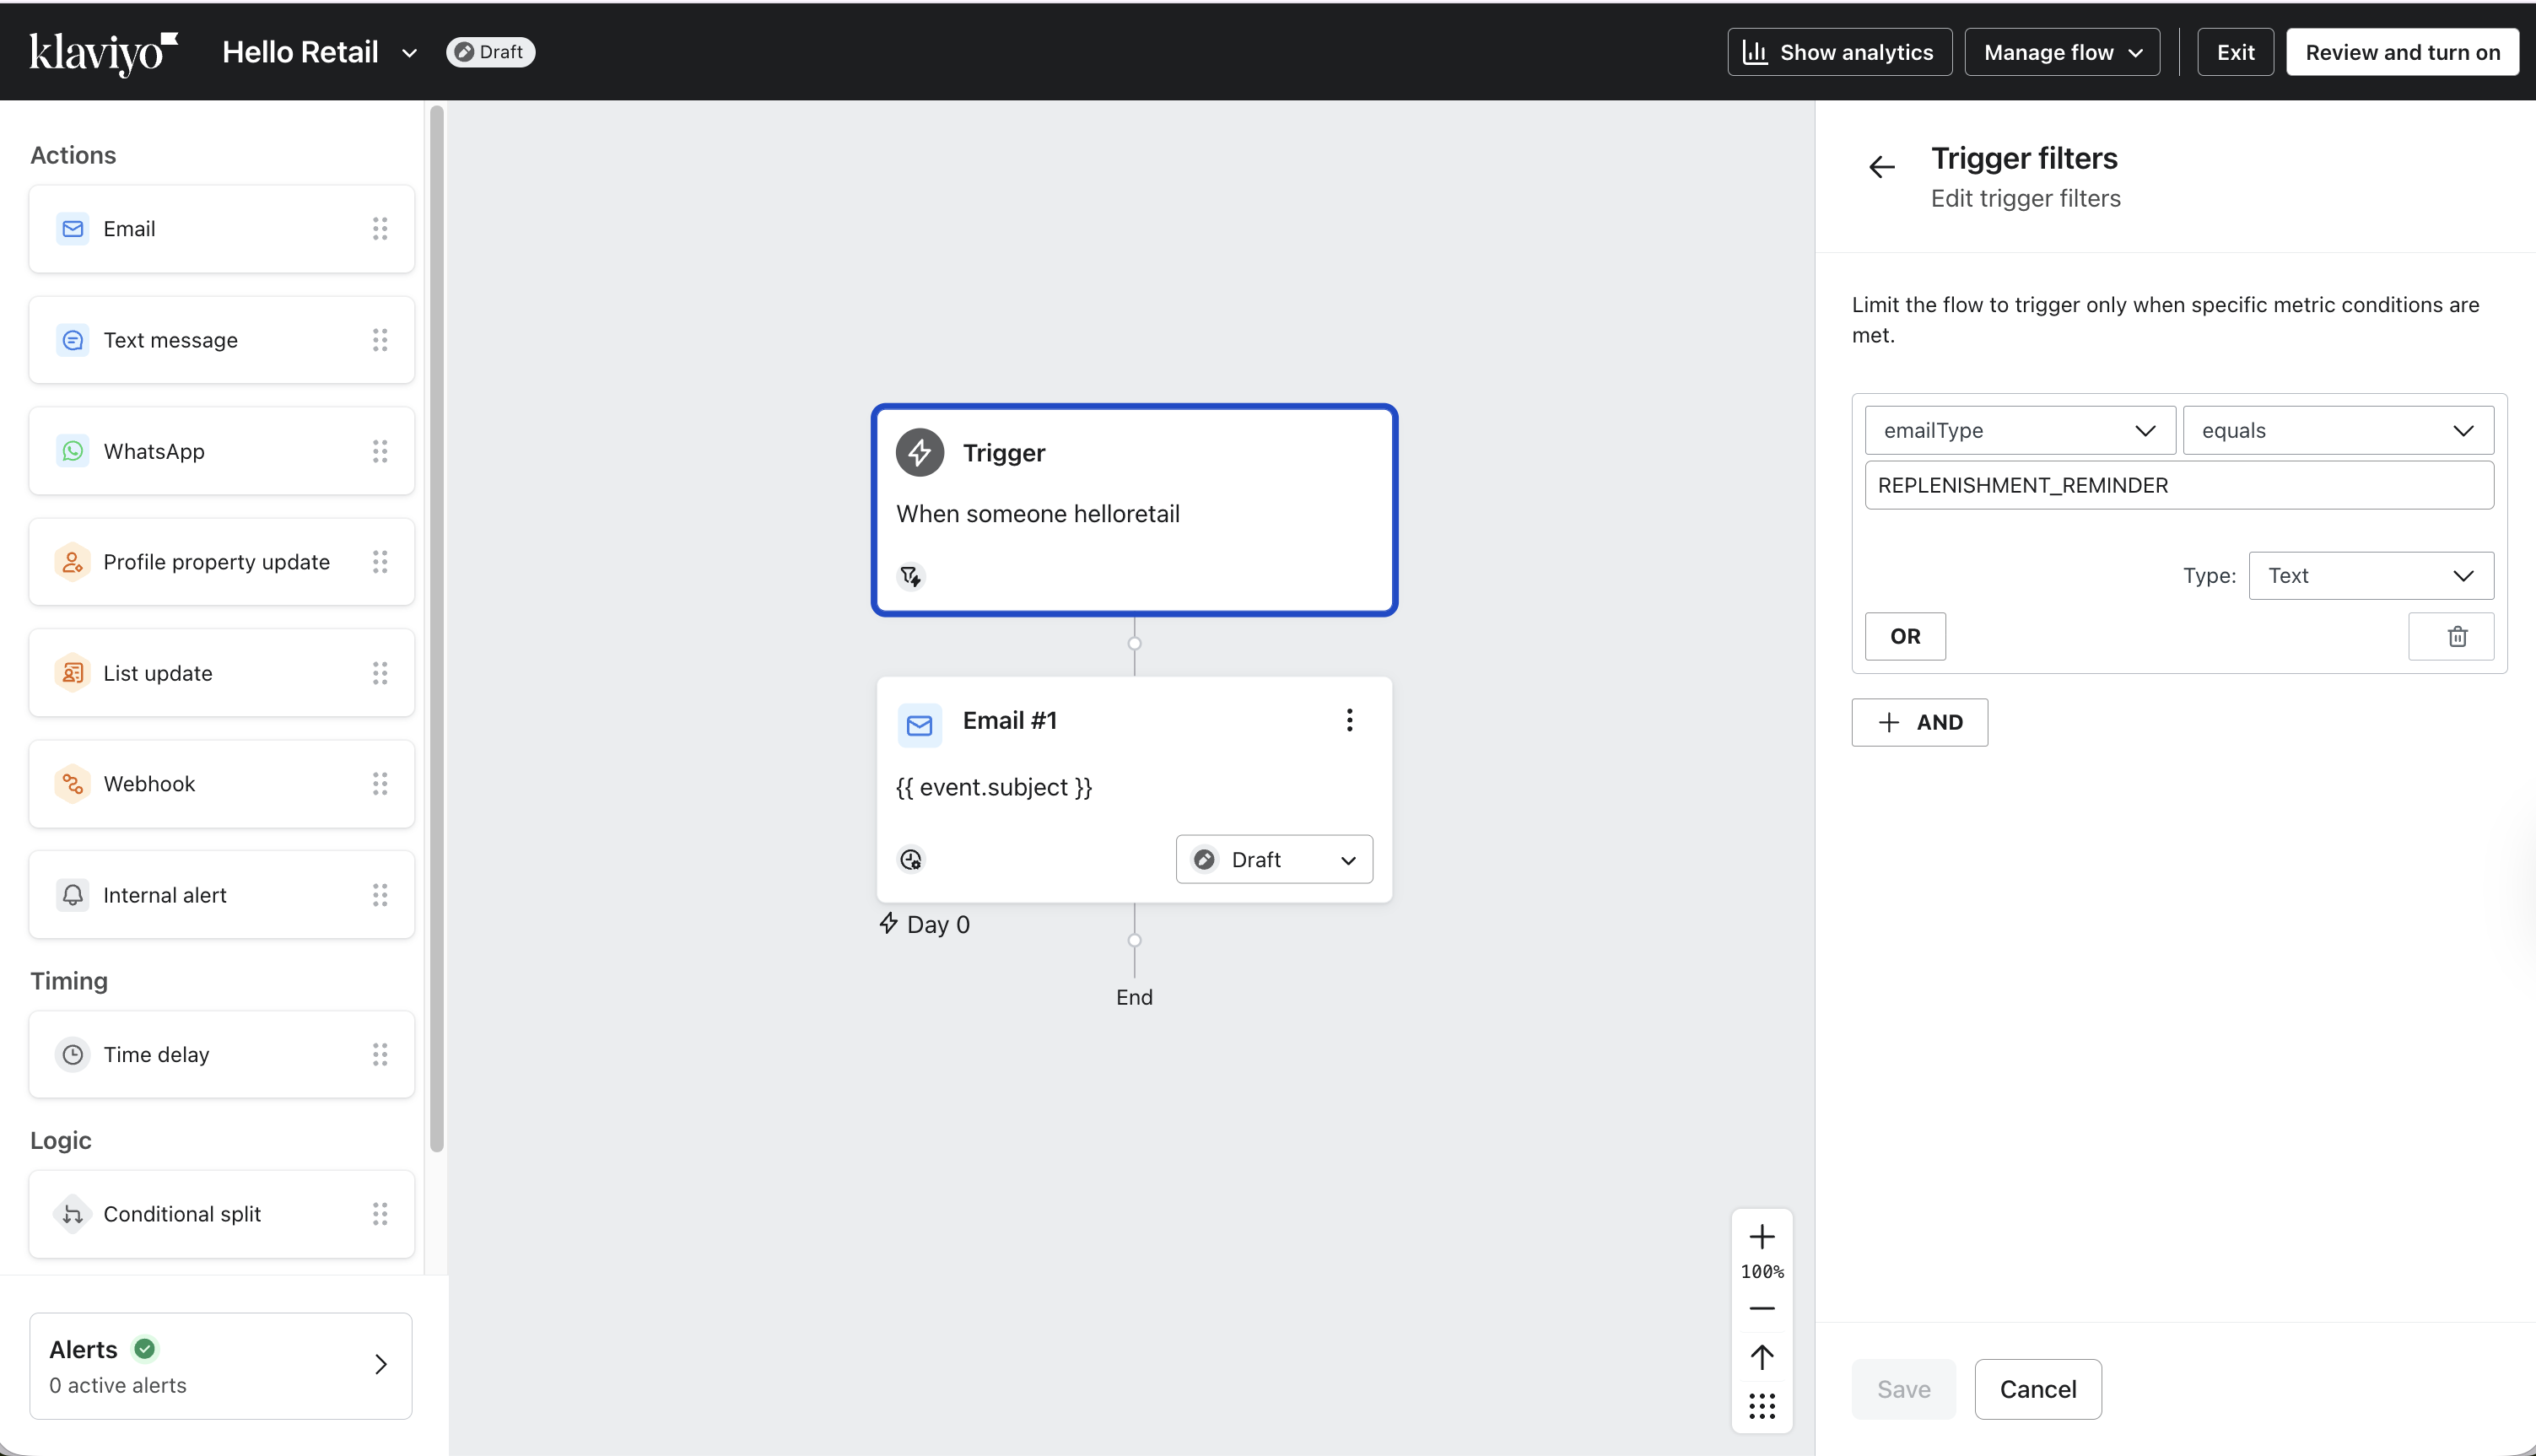
messageType is sent with every Product Agent event and identifies which agent generated it. The available values are:
Replenishment Reminder
Alternative Picks
Recommended Add-ons
Price Drop – Viewed Product
Price Drop – Purchased Replenishment
Price Drop – Alternative Product
Price Drop – Complementary Product
Warning
If you use Trigger Filters, make sure every active agent has a corresponding flow with the correct filter. Without a matching flow, events for that agent will not trigger any emails.
Trigger Filters can also be used with other event properties, such as language, which is useful if multiple websites or languages send data into the same Klaviyo account.
Optional: Customising your email text
By default, Product Agents generate dynamic text for your emails using AI. If you prefer to write your own copy, or want to use product variables directly in your templates, see Customising Your Email Templates.
Excluding specific profiles from Product Agent emails
If a customer feels they are receiving too many emails, you may want to stop them from receiving Product Agent emails without unsubscribing them from your regular marketing. The cleanest way to do this in Klaviyo is to combine a custom profile property with a segment.
Step 1: Set a custom property on the profile
In Klaviyo, open the profile you want to exclude. Scroll down to the Custom properties section and click Add custom property.
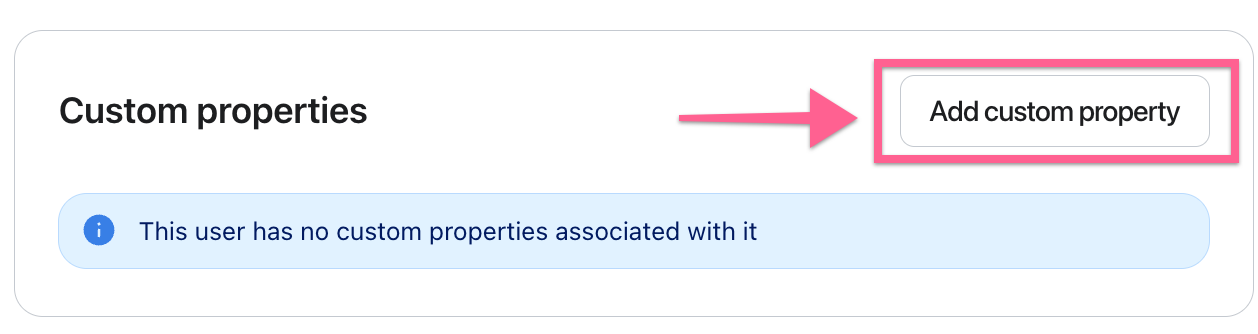
Add the following:
- Property name:
excludeProductAgents - Value:
yes(as a string)
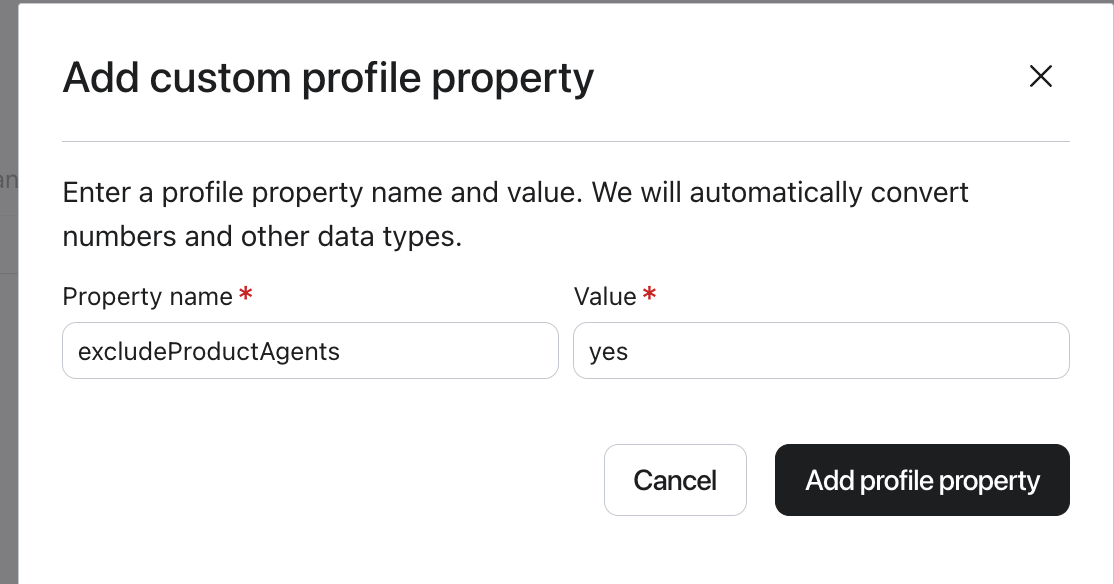
Using a string value avoids Klaviyo treating the field as a boolean, which keeps the segment builder straightforward. You can set this manually on individual profiles, or update it programmatically via the Klaviyo API.
Step 2: Create or update your permission segment
If you are already using a segment as your permission source, add a condition to exclude anyone with this property set. If you are using a list today, you will need to switch to a segment first — see Step 2 above.
The segment condition should be:
- Base: your existing subscriber list or consent condition (for example, "is subscribed to email marketing")
- And:
excludeProductAgentsis not set (Type: Text)
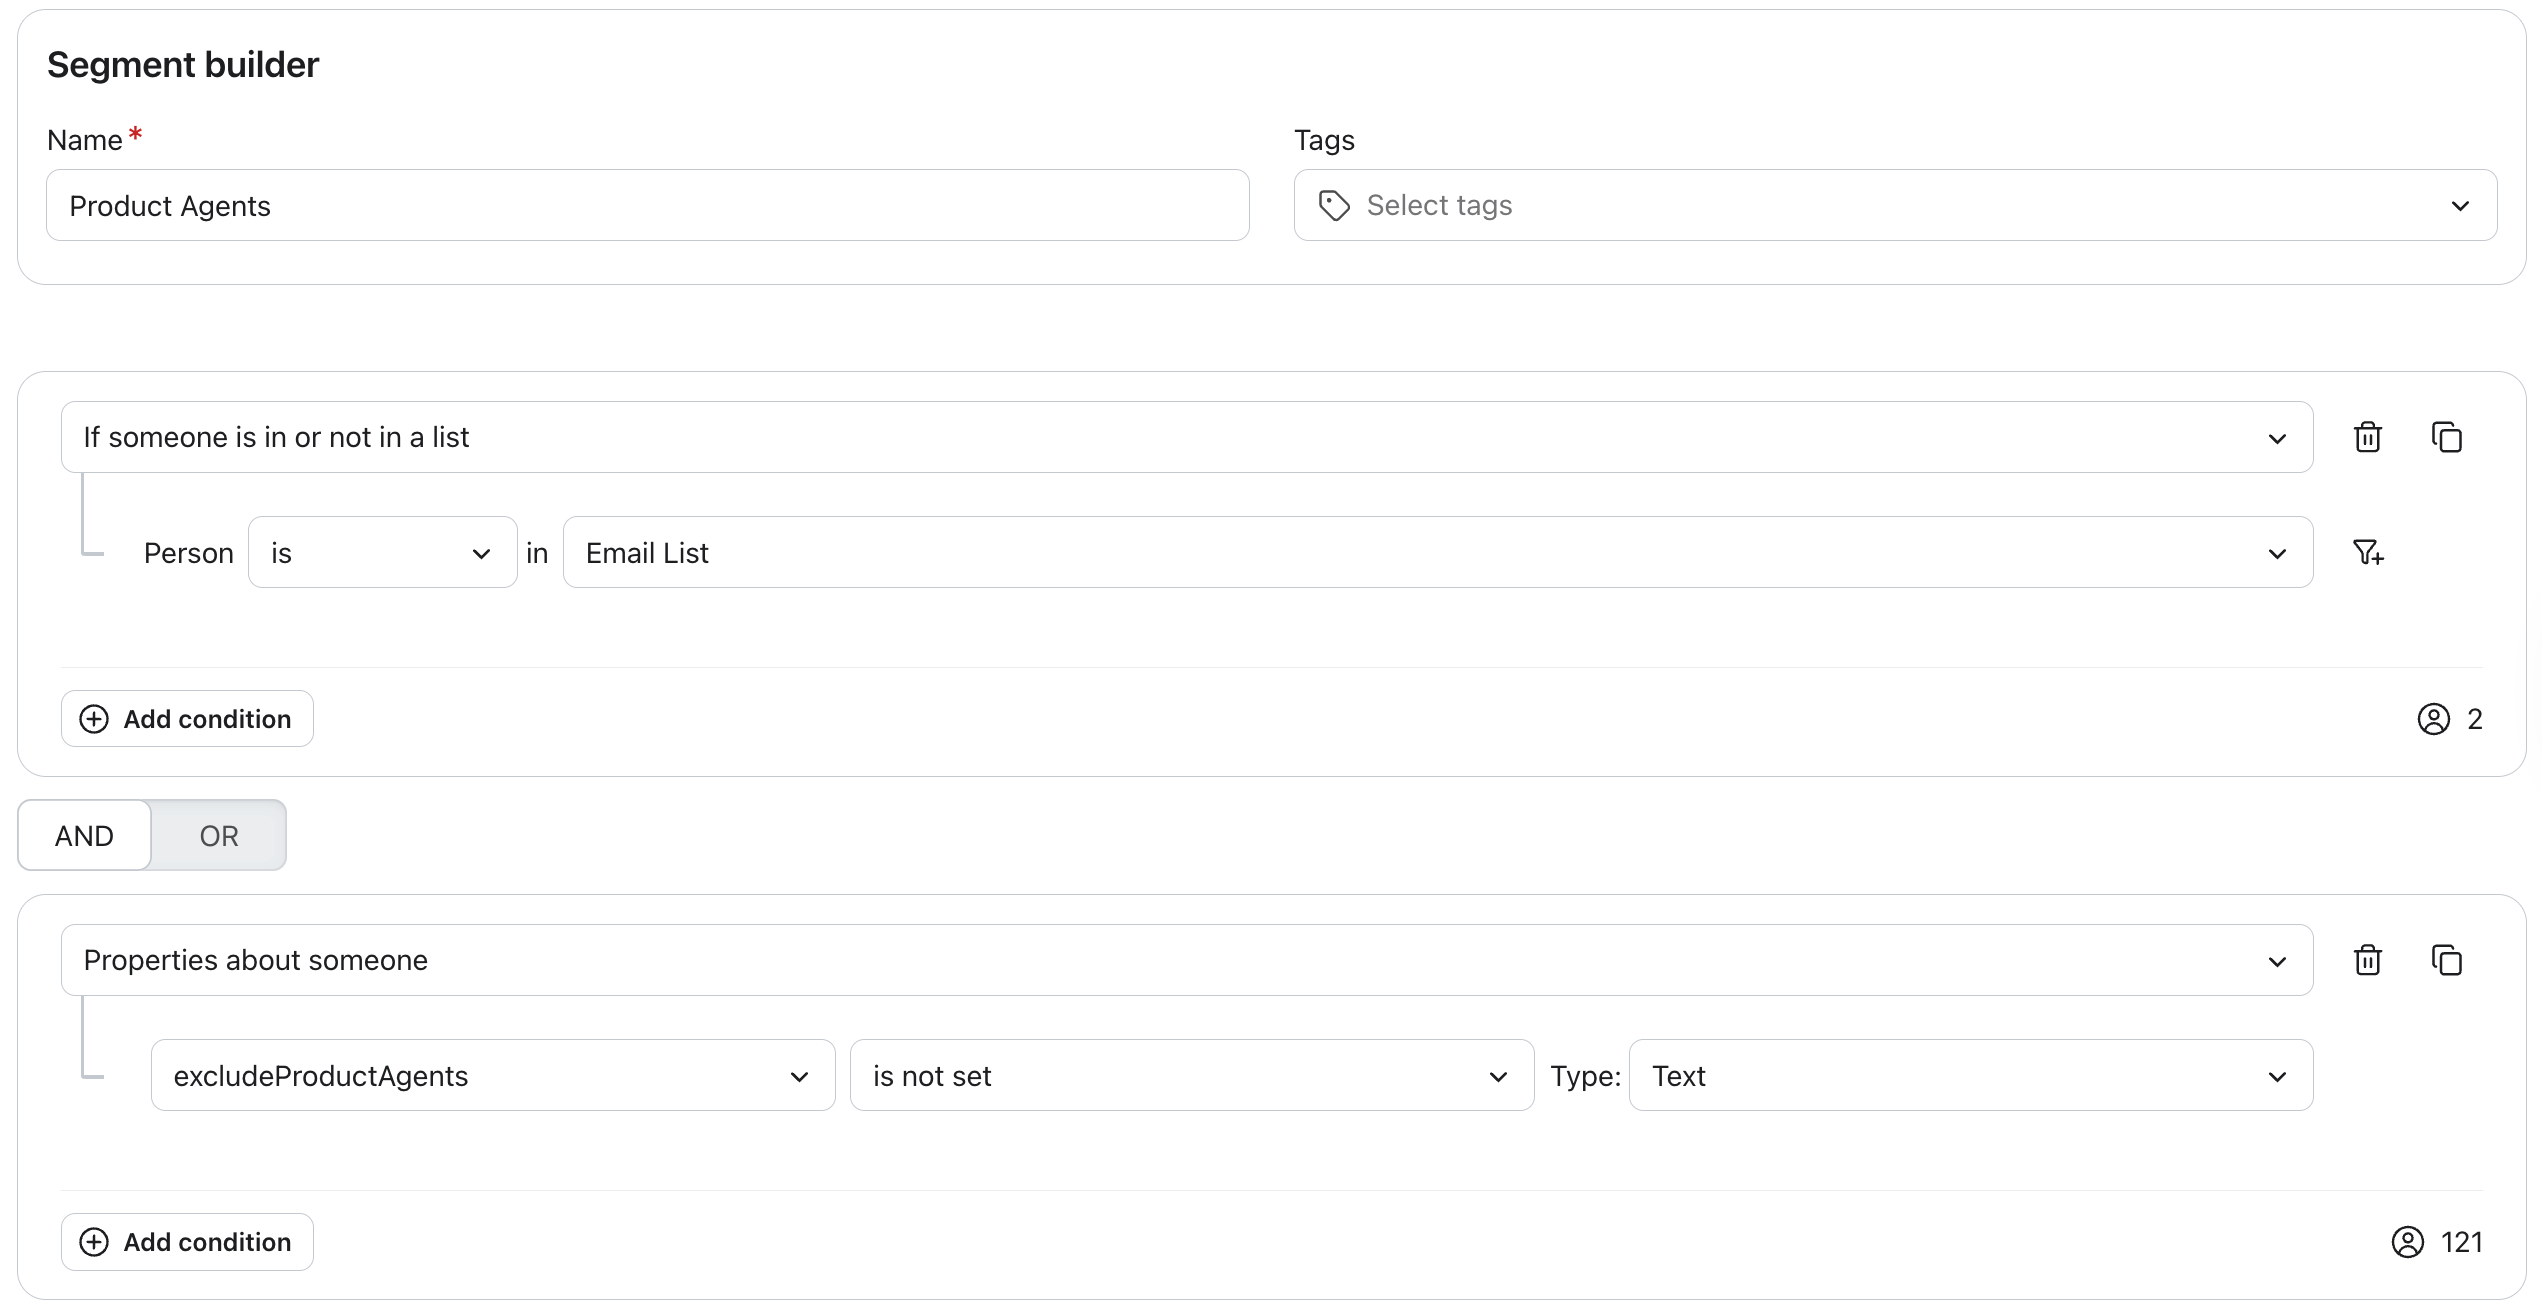
Because the condition checks for existence rather than a specific value, you only need to set the property on profiles you want to exclude. Everyone else is included by default — no property needs to be set on the rest of your subscriber base.
This keeps the customer in your main marketing audience so they continue to receive newsletters and campaigns, but removes them from the segment that Product Agents use to check permission.
Step 3: Select the segment as your permission source
If you have not already done so, go to the Product Agents settings in Hello Retail and set this segment as your permission source.
Once the segment is active, Product Agents will no longer send emails to any profile where excludeProductAgents is set to true. Removing the property from a profile will automatically add them back to the segment on Klaviyo's next evaluation.
Note
Klaviyo evaluates segments dynamically, so changes to the excludeProductAgents property take effect without any manual steps on the Hello Retail side.
Troubleshooting: Why was no email sent?
If an expected email was not received, there can be several possible reasons:
-
The Klaviyo flow is not set live
The flow may exist but is still in draft mode, so the event does not trigger any emails. -
Smart Sending is enabled in the flow
If the recipient has already received another email within the Smart Sending window, it may suppress the message. -
Flow filters prevent the email from triggering
The event may be sent correctly, but the filters in the flow do not match the event data. -
The flow is not triggered by the Product Agent event
The Klaviyo flow must listen to the correct event from Hello Retail in order to send emails. -
The email address has unsubscribed from marketing emails
If the recipient has previously unsubscribed, Klaviyo will not send the message.
Product Agents send events to Klaviyo. Whether an email is actually sent depends on the configuration of the Klaviyo flow.
Next step
With setup complete, the next step is to review the available Product Agents and decide which ones to enable. Each agent targets a different customer moment — from replenishment reminders to price drop alerts — so it's worth understanding what each one does before going live.
Available Agents and Use Cases